
Quick Start Guide
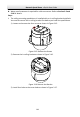
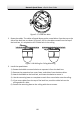
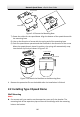
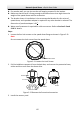
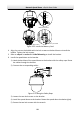
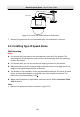
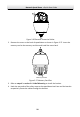
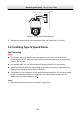
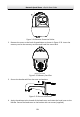
Table Of Contents
- 1 Overview
- 1.1 Speed Dome Overview
- 1.1.1 Overview of Type I Speed Dome
- 1.1.2 Overview of Type II Speed Dome
- 1.1.3 Overview of Type III Speed Dome
- 1.1.4 Overview of Type IV Speed Dome
- 1.1.5 Overview of Type V Speed Dome
- 1.1.6 Overview of Type VI Speed Dome
- 1.1.7 Overview of Type VII Speed Dome
- 1.1.8 Overview of Type VIII Speed Dome
- 1.1.9 Overview of Type IX Speed Dome
- 1.2 Cable Interfaces
- 1.3 Alarm Output
- 1.1 Speed Dome Overview
- 2 Installation
- 2.1 Installing Type I Speed Dome
- 2.2 Installing Type II Speed Dome
- 2.3 Installing Type III Speed Dome
- 2.4 Installing Type IV Speed Dome
- 2.5 Installing Type V Speed Dome
- 2.6 Installing Type VI and VII Speed Dome
- 2.7 Installing Type VIII Speed Dome
- 2.8 Installing Type IX Speed Dome
- 2.9 Installation of Network Cable Waterproof Jacket
- 2.10 Installation of Water-proof Tape
- 2.11 Protective Measures for Outdoor Installation
- 3 Activate and Access Network Camera

Network Speed Dome·Quick Start Guide
17
For wooden wall, you can just use the self-tapping screw to fix the bracket.
Make sure that the wall is strong enough to withstand more than eight times the
weight of the speed dome and the accessories.
The bracket shown in installation is the recommended bracket for this series of
speed dome, and a pendent adapter is required if any other bracket is selected. The
dimension of pendant adapter is G1
1
2
.
Water-proof treatment is required for cable connectors. Refer to Section 2.9 and
2.10 for details.
Steps:
1. Loosen the four lock screws on the speed dome flange as shown in Figure 2-21.
Note:
Do not remove the lock screws from the speed dome.
Lock Screws
Figure 2-21 Loosen the Lock Screws
2. Pull the bubble to separate it from the back box, and remove the protective foam,
sticker and lens cover from the dome drive.
Back Box
Lens Cover
Protective Foam
Bubble
Sticker
Figure 2-22 Remove the Protective Accessories
3. Install the memory card.