
User's Manual


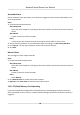
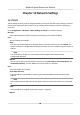

Table Of Contents
- Legal Information
- Chapter 1 Overview
- Chapter 2 Device Activation and Accessing
- Chapter 3 Person Arming
- Chapter 4 Vehicle Arming
- Chapter 5 Face Capture
- Chapter 6 Road Traffic
- Chapter 7 PTZ
- 7.1 PTZ Control
- 7.2 Set Preset
- 7.3 Set Patrol Scan
- 7.4 Set Pattern Scan
- 7.5 Set Limit
- 7.6 Set Initial Position
- 7.7 Set Scheduled Tasks
- 7.8 Set Park Action
- 7.9 Set Privacy Mask
- 7.10 Set Smart Tracking
- 7.11 Set Device Position
- 7.12 Set Power Off Memory
- 7.13 Set PTZ Priority
- 7.14 Set Rapid Focus
- 7.15 GPS Calibration
- Chapter 8 Live View
- 8.1 Live View Parameters
- 8.1.1 Start and Stop Live View
- 8.1.2 Aspect Ratio
- 8.1.3 Live View Stream Type
- 8.1.4 Quick Set Live View
- 8.1.5 Select the Third-Party Plug-in
- 8.1.6 Start Digital Zoom
- 8.1.7 Conduct Regional Focus
- 8.1.8 Conduct Regional Exposure
- 8.1.9 Count Pixel
- 8.1.10 Light
- 8.1.11 Operate Wiper
- 8.1.12 Lens Initialization
- 8.1.13 Track Manually
- 8.1.14 Conduct 3D Positioning
- 8.2 Set Transmission Parameters
- 8.3 Smart Display
- 8.1 Live View Parameters
- Chapter 9 Video and Audio
- Chapter 10 Video Recording and Picture Capture
- Chapter 11 Event and Alarm
- Chapter 12 Arming Schedule and Alarm Linkage
- Chapter 13 Network Settings
- Chapter 14 System and Security
- 14.1 View Device Information
- 14.2 Restore and Default
- 14.3 Search and Manage Log
- 14.4 Import and Export Configuration File
- 14.5 Export Diagnose Information
- 14.6 Reboot
- 14.7 Upgrade
- 14.8 View Open Source Software License
- 14.9 Set Live View Connection
- 14.10 Time and Date
- 14.11 Set RS-485
- 14.12 Security
- Appendix A. Device Command
- Appendix B. Device Communication Matrix

Steps
1. Go to Conguraon → Event → Smart E
vent → Unaended Baggage Detecon .
2. Check Enable.
3. Oponal: Click Lock to lock PTZ control to prevent the interrupon from other PTZ related
acon during conguraon.
Normally, the PTZ control is automacally locked when you enter the conguraon interface.
You can manually resume the lock when the countdown is over.
4. Adjust the live image to the desired scene by using PTZ control buons.
5. Draw detecon area.
1) Select a Region No.. Up to 4 regions can be set.
2) Click Detecon Area.
3) Click on the live image to draw the boundaries of the detecon area, and right click to
complete drawing.
6. Oponal: Set the minimum size and the maximum size for the target to improve detecon
accuracy. Only targets whose size are between the maximum size and the minimum size trigger
the detecon.
1) Click Max. Size, and drag the mouse on live image. If you want to change the size, click the
buon and draw again.
2) Click Min. Siz
e, and drag the mouse on the live image. If you want to change the size, click
the buon and draw again.
7. Set
detecon parameters.
Sensivity The value of the sensivity denes the size of the object which can trigger the
alarm, when the sensivity is high, a v
ery small object can trigger the alarm.
Threshold It stands for the me of the objects le in the area. Alarm is triggered aer the
object is le and s
tays in the area for the set me period.
Figure 11-9 Draw Area
8. Click Save.
9. R
epeat above steps to set other regions.
Network Speed Dome User Manual
82