
User Manual
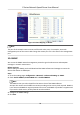

Table Of Contents
- Legal Information
- Chapter 1 Overview
- Chapter 2 Device Activation and Accessing
- Chapter 3 Face Capture
- Chapter 4 PTZ
- Chapter 5 Live View
- 5.1 Live View Parameters
- 5.1.1 Start and Stop Live View
- 5.1.2 Aspect Ratio
- 5.1.3 Live View Stream Type
- 5.1.4 Quick Set Live View
- 5.1.5 Select the Third-Party Plug-in
- 5.1.6 Start Digital Zoom
- 5.1.7 Conduct Regional Focus
- 5.1.8 Conduct Regional Exposure
- 5.1.9 Count Pixel
- 5.1.10 Light
- 5.1.11 Operate Wiper
- 5.1.12 Lens Initialization
- 5.1.13 Track Manually
- 5.1.14 Conduct 3D Positioning
- 5.1.15 OSD Menu
- 5.1.16 Display Target Information on Live View
- 5.2 Set Transmission Parameters
- 5.3 Smart Display
- 5.1 Live View Parameters
- Chapter 6 Video and Audio
- Chapter 7 Video Recording and Picture Capture
- Chapter 8 Event and Alarm
- Chapter 9 Arming Schedule and Alarm Linkage
- Chapter 10 Network Settings
- Chapter 11 System and Security
- 11.1 View Device Information
- 11.2 Restore and Default
- 11.3 Search and Manage Log
- 11.4 Import and Export Configuration File
- 11.5 Export Diagnose Information
- 11.6 Reboot
- 11.7 Upgrade
- 11.8 View Open Source Software License
- 11.9 Set Live View Connection
- 11.10 Time and Date
- 11.11 Set RS-485
- 11.12 Security
- Appendix A. Device Command
- Appendix B. Device Communication Matrix

3. Select Hik-Connect as the
Plaorm Access Mode.
4. Check Enable.
5. Click and read "Terms of Service" and "Privacy Policy" in pop-up window.
6. Create a
vericaon code or change the old vericaon code for the camera.
Note
The vericaon code is required when you add the camera to Hik-Connect service.
7. Save the
sengs.
Enable Hik-Connect Service via SADP Soware
This part introduce how to enable Hik-Connect service via SADP soware of an acvated camera.
Steps
1. Run SADP
soware.
2. Select a camera and enter Modify Network Parameters page.
3. Check Enable Hik-Connect.
4. Create a
vericaon code or change the old vericaon code.
Note
The vericaon code is required when you add the camera to Hik-Connect service.
5. Click and read "Terms of Service" and "Privacy Policy".
6. Conrm the sengs.
10.7.2 Set Up Hik-Connect
Steps
1. Download and install the Hik-Connect app by searching "Hik-Connect" in App Store or
TM
.
2. Launch the app and register for a Hik-Connect user account.
3. Log in
aer registraon.
10.7.3 Add Camera to Hik-Connect
Steps
1. Connect your mobile device to a Wi-Fi.
2. Log into the Hik-Connect app.
3. In the home page, tap "+" on the upper-right corner to add a camera.
4. Scan the QR code on camera body or on the Quick Start Guide cover.
E Series Network Speed Dome User Manual
74