
User Manual

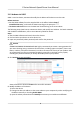

Table Of Contents
- Legal Information
- Chapter 1 Overview
- Chapter 2 Device Activation and Accessing
- Chapter 3 Face Capture
- Chapter 4 PTZ
- Chapter 5 Live View
- 5.1 Live View Parameters
- 5.1.1 Start and Stop Live View
- 5.1.2 Aspect Ratio
- 5.1.3 Live View Stream Type
- 5.1.4 Quick Set Live View
- 5.1.5 Select the Third-Party Plug-in
- 5.1.6 Start Digital Zoom
- 5.1.7 Conduct Regional Focus
- 5.1.8 Conduct Regional Exposure
- 5.1.9 Count Pixel
- 5.1.10 Light
- 5.1.11 Operate Wiper
- 5.1.12 Lens Initialization
- 5.1.13 Track Manually
- 5.1.14 Conduct 3D Positioning
- 5.1.15 OSD Menu
- 5.1.16 Display Target Information on Live View
- 5.2 Set Transmission Parameters
- 5.3 Smart Display
- 5.1 Live View Parameters
- Chapter 6 Video and Audio
- Chapter 7 Video Recording and Picture Capture
- Chapter 8 Event and Alarm
- Chapter 9 Arming Schedule and Alarm Linkage
- Chapter 10 Network Settings
- Chapter 11 System and Security
- 11.1 View Device Information
- 11.2 Restore and Default
- 11.3 Search and Manage Log
- 11.4 Import and Export Configuration File
- 11.5 Export Diagnose Information
- 11.6 Reboot
- 11.7 Upgrade
- 11.8 View Open Source Software License
- 11.9 Set Live View Connection
- 11.10 Time and Date
- 11.11 Set RS-485
- 11.12 Security
- Appendix A. Device Command
- Appendix B. Device Communication Matrix

5) Click Save.
5. Set linkage method. See Linkage Method
Sengs .
3.2 Operate Manual Face Capture
Capture the target face manually in live view image.
Steps
1. Click Live View.
2. Click
to start manual face capture.
3. Draw a frame to select the target face in live view image.
The captured picture can be uploaded to the center.
4. Click the icon again to stop manual face capture.
3.3 Overlay and Capture
Choose to congure capture parameters and the informaon you want to display on stream and
picture.
Display on Stream
Display smart
informaon on stream, including the target and rules informaon.
Display on Picture
Overlay the alarm picture with target informaon.
Target Picture Sengs
You can set the face picture type by selecng Custom, Head Shot, Half-Body Shot, or Full-Body
Shot. If you select Custom, you can
dene detailed picture width and height of a picture freely.
If the captured pictures should have the same picture height, check Fixed Value and input
desired picture height.
Background Picture
Sengs
Comparing to target picture, background picture is the scene image oers extra environmental
informaon. You can set the background picture quality and resoluon. If the background image
need to be uploaded to surveillance center, check Background Upload.
Camera
Informaon
Enter Device No. and Camera Info in order to manage the monitoring device.
Text Overlay
You can check desired items and adjust their order to display on captured pictures by clicking
.
E Series Network Speed Dome User Manual
9