
Quick Start Guide
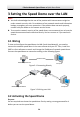
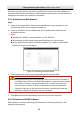
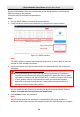
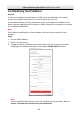

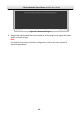
Table Of Contents
- 1 Overview
- 2 Installation
- 2.1 Installing DE4xxx Series Speed Dome
- 2.2 Installing DE4xxxI Series (IR) Speed Dome
- 2.3 Installing DE5xxx Series Speed Dome
- 2.4 Installing DE5xxxI Series (IR) Speed Dome
- 2.5 Installing DE6xxxI Series (IR) Speed Dome
- 2.6 Installing DE7xxxI Series (IR) Speed Dome
- 2.7 Protective Measures for Outdoor Installation
- 3 Setting the Speed Dome over the LAN
- 4 Accessing via Web Browser
- 5 Operating via Hik-Connect App

E Series Network Speed Dome·Quick Start Guide
29
4 Accessing via Web Browser
System Requirement:
Operating System: Microsoft Windows XP SP1 and above version/Vista/Win7/Server
2003/Server 2008 32bits
CPU: Intel Pentium IV 3.0 GHz or higher
RAM: 1G or higher
Display: 1024 × 768 resolution or higher
Web Browser: Internet Explorer 7.0 and above version, Apple Safari 5.02 and above
version, Mozilla Firefox 5 and above version and Google Chrome8 and above version
Steps:
1. Open the web browser.
2. In the browser address bar, input the IP address of the network speed dome, and
enter the login interface.
Note:
The default IP address is 192.168.1.64. You are recommended to change the IP
address to the same subnet with your computer.
3. Input the user name and password.
The admin user should configure the device accounts and user/operator permissions
properly. Delete the unnecessary accounts and user/operator permissions.
Note:
The device IP address gets locked if the admin user performs 7 failed password
attempts (5 attempts for the user/operator).
4. Click Login.
Figure 4-1 Login Interface
5. Install the plug-in before viewing the live video and managing the network speed
dome. Follow the installation prompts to install the plug-in.
Note:
You may have to close the web browser to finish the installation of the plug-in.