
Quick Start Guide
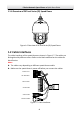
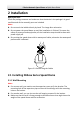
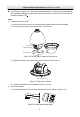
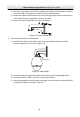
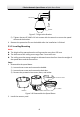


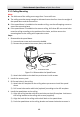
Table Of Contents
- 1 Overview
- 2 Installation
- 2.1 Installing DE4xxx Series Speed Dome
- 2.2 Installing DE4xxxI Series (IR) Speed Dome
- 2.3 Installing DE5xxx Series Speed Dome
- 2.4 Installing DE5xxxI Series (IR) Speed Dome
- 2.5 Installing DE6xxxI Series (IR) Speed Dome
- 2.6 Installing DE7xxxI Series (IR) Speed Dome
- 2.7 Protective Measures for Outdoor Installation
- 3 Setting the Speed Dome over the LAN
- 4 Accessing via Web Browser
- 5 Operating via Hik-Connect App

E Series Network Speed Dome·Quick Start Guide
10
Memory Card Slot
Figure 2-9 Memory Card Slot
3. Drill screw holes in the ceiling.
1) Attach the drill template to the ceiling where you want to install the speed
dome.
2) Cut a hole and drill screw holes according to the drill template.
Note:
±2 mm of the circle diameter is tolerable.
4. Install the toggle bolts.
1) Remove the toggle from the toggle bolt.
2) Insert the bolts into the screw holes on the speed dome as shown in Figure 2-10.
Toggle Bolt Holes
Figure 2-10 Toggle Bolt Holes
3) Rotate the bolts through the screw holes.
4) Install the toggles back as shown in Figure 2-11.