
Quick Start Guide
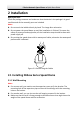
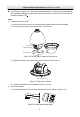
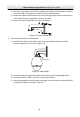
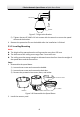


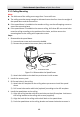
Table Of Contents
- 1 Overview
- 2 Installation
- 2.1 Installing DE4xxx Series Speed Dome
- 2.2 Installing DE4xxxI Series (IR) Speed Dome
- 2.3 Installing DE5xxx Series Speed Dome
- 2.4 Installing DE5xxxI Series (IR) Speed Dome
- 2.5 Installing DE6xxxI Series (IR) Speed Dome
- 2.6 Installing DE7xxxI Series (IR) Speed Dome
- 2.7 Protective Measures for Outdoor Installation
- 3 Setting the Speed Dome over the LAN
- 4 Accessing via Web Browser
- 5 Operating via Hik-Connect App

E Series Network Speed Dome·Quick Start Guide
8
2) Drill four screw holes in the wall according to the holes on the bracket, and then
insert four M8 × 85 expansion screws into the mounting holes.
3) Attach the gasket and the bracket to the wall by aligning the four screw holes on
the bracket with four expansion screws on the wall.
4) Secure the bracket with four hex nuts and washers.
Figure 2-5 Secure the Bracket
3. Install the speed dome to the bracket.
1) Hook the two ends of the safety rope to the speed dome back box and the
bracket respectively as shown in Figure 2-6.
Safety Rope
Figure 2-6 Safety Rope
2) Route the cables through the bracket and connect the corresponding cables.
3) Loosen the two SC-AM6 × 14 lock screws on the bracket.
4) Align the speed dome with bracket and rotate it to the bracket counterclockwise
or clockwise tightly as shown in Figure 2-7.