
Quick Start Guide
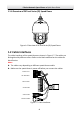
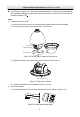


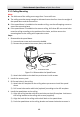
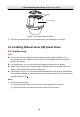
Table Of Contents
- 1 Overview
- 2 Installation
- 2.1 Installing DE4xxx Series Speed Dome
- 2.2 Installing DE4xxxI Series (IR) Speed Dome
- 2.3 Installing DE5xxx Series Speed Dome
- 2.4 Installing DE5xxxI Series (IR) Speed Dome
- 2.5 Installing DE6xxxI Series (IR) Speed Dome
- 2.6 Installing DE7xxxI Series (IR) Speed Dome
- 2.7 Protective Measures for Outdoor Installation
- 3 Setting the Speed Dome over the LAN
- 4 Accessing via Web Browser
- 5 Operating via Hik-Connect App

E Series Network Speed Dome·Quick Start Guide
4
1.1.6 Overview of DE7xxxI Series (IR) Speed Dome
Figure 1-6 Overview of DE7xxxI Series (IR) Speed Dome
1.2 Cable Interfaces
The cable interfaces of the speed dome are shown in Figure 1-7. The cables are
distinguished by different colors. Refer to the labels attached on the cables for
identification.
Notes:
The cables vary depending on different speed dome models.
Make sure the speed dome is power-off before you connect the cables.
Network Cable
Audio Cable
Alarm Cable
Video Cable
RS-485 Cable
Power Cord
Figure 1-7 Cable Interfaces