
User Manual

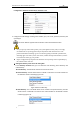
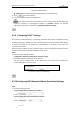
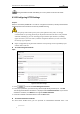

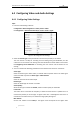
Table Of Contents
- Chapter 1 Overview
- Chapter 2 Network Connection
- Chapter 3 Access to the Network Speed Dome
- Chapter 4 Live View
- Chapter 5 PTZ Configuration
- Chapter 6 Speed Dome Configuration
- 6.1 Configuring Local Parameters
- 6.2 Configuring Time Settings
- 6.3 Configuring Network Settings
- 6.3.1 Configuring TCP/IP Settings
- 6.3.2 Configuring Port Settings
- 6.3.3 Configuring PPPoE Settings
- 6.3.4 Configuring DDNS Settings
- 6.3.5 Configuring SNMP Settings
- 6.3.6 Configuring 802.1X Settings
- 6.3.7 Configuring QoS Settings
- 6.3.8 Configuring FTP Settings
- 6.3.9 Configuring UPnP™ Settings
- 6.3.10 Configuring NAT (Network Address Translation) Settings
- 6.3.11 Configuring Email Settings
- 6.3.12 Configuring Platform Access Settings
- 6.3.13 Configuring HTTPS Settings
- 6.4 Configuring Video and Audio Settings
- 6.5 Configuring Image Settings
- 6.6 Configuring and Handling Alarms
- 6.6.1 Configuring Motion Detection
- 6.6.2 Configuring Video Tampering Alarm
- 6.6.3 Configuring External Alarm Input
- 6.6.4 Configuring Alarm Output
- 6.6.5 Handling Exception
- 6.6.6 Detecting Audio Exception
- 6.6.7 Configuring Dual-VCA
- 6.6.8 Configuring Intrusion Detection
- 6.6.9 Configuring Line Crossing Detection
- Chapter 7 Record Settings
- Chapter 8 Playback
- Chapter 9 Log Searching
- Chapter 10 Others
- Appendix

User Manual of E Series Network Speed Dome
© Hikvision
48
Figure 6-23 Email Settings
2. Configure the following settings:
Sender: The name of the email sender.
Sender’s Address: The email address of the sender.
SMTP Server: The SMTP Server IP address or host name (e.g., smtp.263xmail.com).
SMTP Port: The SMTP port. The default TCP/IP port for SMTP is 25.
Enable SSL: Check the checkbox to enable SSL if it is required by the SMTP server.
Attached Image: Check the checkbox of Attached Image if you want to send emails with
attached alarm images.
Interval: The interval refers to the time between two actions of sending attached pictures.
Authentication (optional): If your email server requires authentication, check this checkbox to
use authentication to log in to this server and enter the login user name and password.
For your privacy and to better protect your system against security risks, we strongly
recommend the use of strong passwords for all functions and network devices. The
password should be something of your own choosing (using a minimum of 8 characters,
including upper case letters, lower case letters, numbers and special characters) in order
to increase the security of your product.
Proper configuration of all passwords and other security settings is the responsibility of
the installer and/or end-user.
Receiver: Select the receiver to which the email is sent. Up to 2 receivers can be configured.
Receiver: The name of the user to be notified.
Receiver’s Address: The email address of user to be notified. (Optional: click Test to make sure
that the email server can send email out.)
3. Click to save the settings.
6.3.12 Configuring Platform Access Settings
Configuring EZVIZ Cloud P2P
Purpose:
EZVIZ Cloud P2P provides the mobile phone application and as well the service platform page to
access and manage your connected NVR, which enables you to get a convenient remote access to
the surveillance system.
Steps:
1. Enter the Platform Access configuration interface.
Configuration > Advanced Configuration > Network > Platform Access
2. Check the checkbox of the Enable.
3. Select the Platform Type as the EZVIZ Cloud P2P in the dropdown list.
4. Click the Save button to activate the settings.
You can view the register status of the device in the corresponding text.