
User Manual
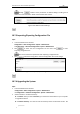
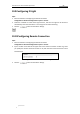
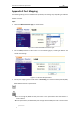
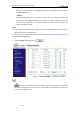
Table Of Contents
- Chapter 1 Overview
- Chapter 2 Network Connection
- Chapter 3 Access to the Network Speed Dome
- Chapter 4 Live View
- Chapter 5 PTZ Configuration
- Chapter 6 Speed Dome Configuration
- 6.1 Configuring Local Parameters
- 6.2 Configuring Time Settings
- 6.3 Configuring Network Settings
- 6.3.1 Configuring TCP/IP Settings
- 6.3.2 Configuring Port Settings
- 6.3.3 Configuring PPPoE Settings
- 6.3.4 Configuring DDNS Settings
- 6.3.5 Configuring SNMP Settings
- 6.3.6 Configuring 802.1X Settings
- 6.3.7 Configuring QoS Settings
- 6.3.8 Configuring FTP Settings
- 6.3.9 Configuring UPnP™ Settings
- 6.3.10 Configuring NAT (Network Address Translation) Settings
- 6.3.11 Configuring Email Settings
- 6.3.12 Configuring Platform Access Settings
- 6.3.13 Configuring HTTPS Settings
- 6.4 Configuring Video and Audio Settings
- 6.5 Configuring Image Settings
- 6.6 Configuring and Handling Alarms
- 6.6.1 Configuring Motion Detection
- 6.6.2 Configuring Video Tampering Alarm
- 6.6.3 Configuring External Alarm Input
- 6.6.4 Configuring Alarm Output
- 6.6.5 Handling Exception
- 6.6.6 Detecting Audio Exception
- 6.6.7 Configuring Dual-VCA
- 6.6.8 Configuring Intrusion Detection
- 6.6.9 Configuring Line Crossing Detection
- Chapter 7 Record Settings
- Chapter 8 Playback
- Chapter 9 Log Searching
- Chapter 10 Others
- Appendix

User Manual of E Series Network Speed Dome
© Hikvision
95
10.9 Configuring IR Light
Steps:
1. Enter the interface of configuring the remote connection:
Configuration> Advanced Configuration> System > Service
2. Check the checkbox to enable the IR light function, and then the light will be turned on
automatically when the illumination is not enough for the video monitoring.
3. Click the button to activate the settings.
10.10 Configuring Remote Connection
Steps:
1. Enter the interface of configuring the remote connection:
Configuration> Advanced Configuration> System > Service
2. Input a number in text field as the upper limit of the remote connection number. E.g. when
you specify the remote connection number as 10, then the 11th remote connection cannot
be established.
Figure 10-14 Live View Connection Settings
3. Click the button to activate the settings.