
Quick Start Guide
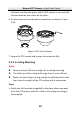
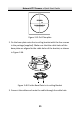
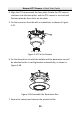
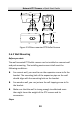
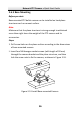
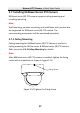
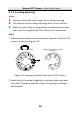
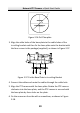
Table Of Contents
- 1 Overview
- 2 Installation
- 3 Setting the PTZ Camera over the LAN
- 4 Accessing via Web Browser
- 5 Operating via Hik-Connect App

Network PTZ Camera·Quick Start Guide
30
clockwise into the base plate, and the PTZ camera is secured with
the base plate by three locks on the plate.
6. Fix the screws on the side with a screwdriver, as shown in Figure
2-44.
①
OPEN LOCK
②
③
Figure 2-44 Fix the Camera
7. Secure the PTZ camera and remove the protective film.
2.5.2 In-ceiling Mounting
Notes:
Reserve at least 250 mm of height for in-ceiling mounting.
The thickness of the ceiling shall range from 5 mm to 40 mm.
Make sure the ceiling is strong enough to withstand more than
four times the weight of the PTZ camera and its accessories.
Steps:
1. Attach the drill template (supplied) to the place where you want
to fix the PTZ camera, and drill a hole in the ceiling according to
the template.