
User Manual

UM D-2CE11H0T-PIRL 2018 Hikvision USA Inc.
2 Introduction
2.1 Product Features
The main features are as follows:
• High performance CMOS sensor
• IR cut filter with auto switch
• OSD menu with configurable parameters
• Auto white balance
• Internal synchronization
• SMART IR mode
• Visible alarm
• PIR detection
• 3-axis adjustment
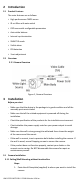
2.2 Overview
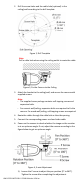
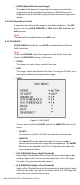
2.2.1 Camera Overview
Figure 1, Camera Overview
3 Installation
Before you start
•
Make sure that the device in the package is in good condition and all the
assembly parts are included.
•
Make sure that all the related equipment is powered off during the
installation.
•
Check the specification of the products for the installation environment.
•
Check whether the power supply matches your power output to avoid
damage.
•
Make sure the wall is strong enough to withstand three times the weight
of the camera and the mount.
•
If the wall is cement, insert expansion bolts before installing the camera. If
the wall is wood, use self-tapping screws to secure the camera.
•
If the product does not function properly, contact your dealer or the
nearest service center. Do NOT disassemble the camera for repair or
maintenance yourself.
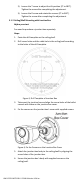
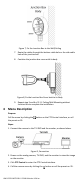
3.1 Camera Installation
3.1.1 Ceiling/Wall Mounting without Junction Box
Steps:
1. Paste the drill template (supplied) to where you want to install the
camera.