
User Manual
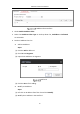
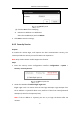

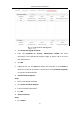
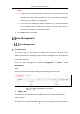
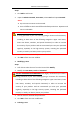
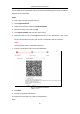
Table Of Contents
- Chapter 1 System Requirement
- Chapter 2 Network Connection
- Chapter 3 Access to the Network Camera
- Chapter 4 Wi-Fi Settings
- Chapter 5 Live View
- Chapter 6 Network Camera Configuration
- Chapter 7 Network Settings
- 7.1 Configuring Basic Settings
- 7.2 Configure Advanced Settings
- 7.2.1 Configuring SNMP Settings
- 7.2.2 Configuring FTP Settings
- 7.2.3 Configuring Email Settings
- 7.2.4 Platform Access
- 7.2.5 Wireless Dial
- 7.2.6 HTTPS Settings
- 7.2.7 Configuring QoS Settings
- 7.2.8 Configuring 802.1X Settings
- 7.2.9 Integration Protocol
- 7.2.10 Bandwidth Adaptation
- 7.2.11 Network Service
- 7.2.12 Smooth Streaming
- 7.2.13 Configuring HTTP Listening
- 7.2.14 Configuring SRTP Settings
- Chapter 8 Video/Audio Settings
- Chapter 9 Image Settings
- Chapter 10 Event Settings
- 10.1 Basic Events
- 10.2 Smart Events
- 10.2.1 Configuring Audio Exception Detection
- 10.2.2 Configuring Defocus Detection
- 10.2.3 Configuring Scene Change Detection
- 10.2.4 Configuring Face Detection
- 10.2.5 Configuring Intrusion Detection
- 10.2.6 Configuring Line Crossing Detection
- 10.2.7 Configuring Region Entrance Detection
- 10.2.8 Configuring Region Exiting Detection
- 10.2.9 Configuring Unattended Baggage Detection
- 10.2.10 Configuring Object Removal Detection
- 10.3 VCA Configuration
- Chapter 11 Storage Settings
- Chapter 12 Playback
- Chapter 13 Picture
- Chapter 14 Application
- Chapter 15 Open Platform
- Chapter 16 Smart Display
- Appendix

Network Camera User Manual
64
2. Click Create Certificate Request.
3. Enter the Certificate ID, click Browser to select the desired server/client
certificate, select the desired import method and enter the required
information.
4. Click OK.
5. (Optional) You can click Export to export the certificate, or click Delete to
delete the certificate to recreate a certificate, or click Certificate Properties
to view the certificate details.
Notes:
● Up to 16 certificates are allowed.
● If certain functions are using the certificate, it cannot be deleted.
● You can view the functions that are using the certificate in the Functions
column.
● You cannot create a certificate that has the same ID with that of the existing
certificate and import a certificate that has the same content with that of
the existing certificate.
CA Certificate
Steps:
1. Click Import.
2. Enter the Certificate ID, click Browser to select the desired server/client
certificate, select the import method and enter the required information.
3. Click OK.
Note: Up to 16 certificates are allowed.
Enable Certificate Expiration Alarm
Steps:
1. Check Enable Certificate Expiration Alarm. If enabled, you will receive an
email or the camera links to the surveillance center that the certificate will
expire soon, or is expired or abnormal.
2. Set the Remind Me Before Expiration (day), Alarm Frequency (day) and
Detection Time (hour).