
User Manual
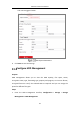
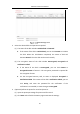
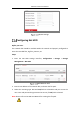
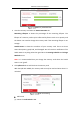
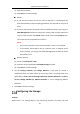
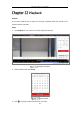
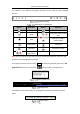
Table Of Contents
- Chapter 1 System Requirement
- Chapter 2 Network Connection
- Chapter 3 Access to the Network Camera
- Chapter 4 Wi-Fi Settings
- Chapter 5 Live View
- Chapter 6 Network Camera Configuration
- Chapter 7 Network Settings
- 7.1 Configuring Basic Settings
- 7.2 Configure Advanced Settings
- 7.2.1 Configuring SNMP Settings
- 7.2.2 Configuring FTP Settings
- 7.2.3 Configuring Email Settings
- 7.2.4 Platform Access
- 7.2.5 Wireless Dial
- 7.2.6 HTTPS Settings
- 7.2.7 Configuring QoS Settings
- 7.2.8 Configuring 802.1X Settings
- 7.2.9 Integration Protocol
- 7.2.10 Bandwidth Adaptation
- 7.2.11 Network Service
- 7.2.12 Smooth Streaming
- 7.2.13 Configuring HTTP Listening
- 7.2.14 Configuring SRTP Settings
- Chapter 8 Video/Audio Settings
- Chapter 9 Image Settings
- Chapter 10 Event Settings
- 10.1 Basic Events
- 10.2 Smart Events
- 10.2.1 Configuring Audio Exception Detection
- 10.2.2 Configuring Defocus Detection
- 10.2.3 Configuring Scene Change Detection
- 10.2.4 Configuring Face Detection
- 10.2.5 Configuring Intrusion Detection
- 10.2.6 Configuring Line Crossing Detection
- 10.2.7 Configuring Region Entrance Detection
- 10.2.8 Configuring Region Exiting Detection
- 10.2.9 Configuring Unattended Baggage Detection
- 10.2.10 Configuring Object Removal Detection
- 10.3 VCA Configuration
- Chapter 11 Storage Settings
- Chapter 12 Playback
- Chapter 13 Picture
- Chapter 14 Application
- Chapter 15 Open Platform
- Chapter 16 Smart Display
- Appendix

Network Camera User Manual
186
bitrate of the video stream can be reduced to lengthen the storage time of the
memory card.
Notes:
Only certain camera models support the function.
The video files recorded in lite storage mode will be played back in full frame
rate (25fps/30fps), and thus the playback process is speeded up to the eye.
1. Enter the Lite Storage interface:
Configuration > Storage > Storage Management > Lite Storage
2. Check the Checkbox of Enable to enable the lite storage function.
3. Input the storage time in the text field. You can view the available space of the SD
card on the page.
4. Click Save to save the settings.
Configuring Cloud Storage
Purpose:
The captured pictures can be saved on Cloud Storage when the function is
configured.
Note: Only certain camera models support the function.
Steps:
1. Check Enable Cloud Storage.
2. Select a protocol version.
3. Input the IP address and port of the storage server.
4. Input the user name, password and confirm password for the authentication of
the storage server if you select the protocol version as Cloud1.0. Input AccessKey and
SecretKey if you select the protocol version as Cloud2.0.
5. Input picture storage pool ID on the server.
6. (Optional) You can click Test to test the cloud storage settings.
7. Click Save.
Note: