
User Manual
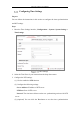
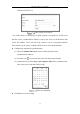

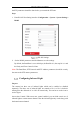


Table Of Contents
- Chapter 1 System Requirement
- Chapter 2 Network Connection
- Chapter 3 Access to the Network Camera
- Chapter 4 Live View
- Chapter 5 Network Camera Configuration
- Chapter 6 Network Settings
- Chapter 7 Video/Audio Settings
- Chapter 8 Image Settings
- Chapter 9 Event Settings
- 9.1 Basic Events
- 9.2 Smart Events
- 9.2.1 Configuring Audio Exception Detection
- 9.2.2 Configuring Defocus Detection
- 9.2.3 Configuring Scene Change Detection
- 9.2.4 Configuring Intrusion Detection
- 9.2.5 Configuring Line Crossing Detection
- 9.2.6 Configuring Region Entrance Detection
- 9.2.7 Configuring Region Exiting Detection
- 9.2.8 Configuring Unattended Baggage Detection
- 9.2.9 Configuring Object Removal Detection
- Chapter 10 Storage Settings
- Chapter 11 Playback
- Chapter 12 Picture
- Appendix

Network Camera User Manual
26
Steps:
1. Check Infrared Light to enable certain sets of infrared lights.
Infrared Light
Note: Without the one-to-one control, the enabled infrared lights works as a group.
Signal from any camera channel can control their on/off status.
2. (Optional) Enable one-to-one control.
3. Click Advanced.
4. Check Enable One-to-One Control.
5. Bind infrared lights to camera channels.
One-to-One Control
6. Click OK.
7. Click Save.
Configuring DST Settings
Purpose:
Daylight Saving Time (DST) is a way of making better use of the natural daylight by
setting your clock forward one hour during the summer months, and back again in the