
User Manual
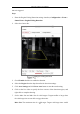
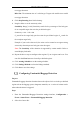
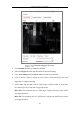
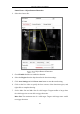
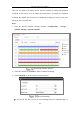


Table Of Contents
- Chapter 1 System Requirement
- Chapter 2 Network Connection
- Chapter 3 Access to the Network Camera
- Chapter 4 Live View
- Chapter 5 Network Camera Configuration
- Chapter 6 Network Settings
- Chapter 7 Video/Audio Settings
- Chapter 8 Image Settings
- Chapter 9 Event Settings
- 9.1 Basic Events
- 9.2 Smart Events
- 9.2.1 Configuring Audio Exception Detection
- 9.2.2 Configuring Defocus Detection
- 9.2.3 Configuring Scene Change Detection
- 9.2.4 Configuring Intrusion Detection
- 9.2.5 Configuring Line Crossing Detection
- 9.2.6 Configuring Region Entrance Detection
- 9.2.7 Configuring Region Exiting Detection
- 9.2.8 Configuring Unattended Baggage Detection
- 9.2.9 Configuring Object Removal Detection
- Chapter 10 Storage Settings
- Chapter 11 Playback
- Chapter 12 Picture
- Appendix

Network Camera User Manual
111
Capture Configuration
2. Go to Capture Schedule tab to configure the capture schedule by click-and-drag
the mouse on the time bar. You can copy the record schedule to other days by
clicking the green copy icon on the right of each time bar.
3. Click Advanced to select stream type.
Advanced Setting of Capture Schedule
4. Click Save to save the settings.
5. Go to Capture Parameters tab to configure the capture parameters.
(1) Check the Enable Timing Snapshot checkbox to enable continuous
snapshot.
(2) Select the picture format, resolution, quality and capture interval.
(3) Check the Enable Event-triggered Snapshot checkbox to enable
event-triggered snapshot.
(4) Select the picture format, resolution, quality, capture interval, and capture