
User Manual


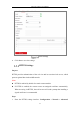

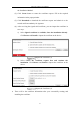
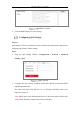
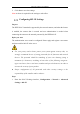
Table Of Contents
- Chapter 1 System Requirement
- Chapter 2 Network Connection
- Chapter 3 Access to the Network Camera
- Chapter 4 Live View
- Chapter 5 Network Camera Configuration
- Chapter 6 Network Settings
- Chapter 7 Video/Audio Settings
- Chapter 8 Image Settings
- Chapter 9 Event Settings
- Chapter 10 Storage Settings
- Chapter 11 Playback
- Chapter 12 Picture
- Appendix

Network Camera User Manual
66
Settings > HTTPS.
2. Check Enable to access the camera via HTTP or HTTPS protocol.
HTTPS Configuration Interface
3. Create the self-signed certificate or authorized certificate.
Create Self-signed Certificate
Create the self-signed certificate
(1) Select Create Self-signed Certificate as the Installation Method.
(2) Click Create button to enter the creation interface.
(3) Enter the country, host name/IP, validity and other information.
(4) Click OK to save the settings.
Note: If you already had a certificate installed, the Create Self-signed
Certificate is grayed out.
Create the request and import the authorized certificate
(1) Select Create the certificate request first and continue the installation as