
DS-2CD6825G0-C-IVS-User-Manul
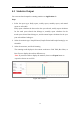
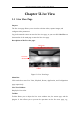
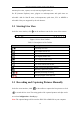
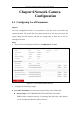
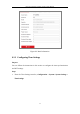
Table Of Contents
- Chapter 1 System Requirement
- Chapter 2 Network Connection
- Chapter 3 Access to the Network Camera
- Chapter 4 People Counting
- Chapter 5 Live View
- Chapter 6 Network Camera Configuration
- Chapter 7 Network Settings
- Chapter 8 Video/Audio Settings
- Chapter 9 Image Settings
- Chapter 10 Event Settings
- Chapter 11 Storage Settings
- Chapter 12 Playback
- Chapter 13 Picture
- Chapter 14 Application
- Appendix

Dual-Lens People Counting Camera User Manual
28
start/stop live view, capture, record, start/stop digital zoom, etc.
For IE (Internet Explorer) users, plug-ins as webcomponents and quick time are
selectable. And for Non-IE users, webcomponents, quick time, VLC or MJPEG is
selectable if they are supported by the web browser.
5.2 Starting Live View
In the live view window, click on the toolbar to start the live view of the camera.
Figure 5-2 Live View Toolbar
Table 5-1 Descriptions of the Toolbar
Icon
Description
/
Start/Stop live view.
The window size is 4:3.
The window size is 16:9.
The original widow size.
Self-adaptive window size.
Live view with the main stream.
Live view with the sub stream.
Click to select the third-party plug-in.
Manually capture the picture.
/
Manually start/stop recording.
/
Start/stop digital zoom function.
Note: The icons vary according to the different camera models.
5.3 Recording and Capturing Pictures Manually
In the live view interface, click on the toolbar to capture the live pictures or click
to record the live view. The saving paths of the captured pictures and clips can be
set on the Configuration > Local page.
Note: The captured image will be saved as JPEG file or BMP file in your computer.