
DS-2CD6825G0-C-IVS-User-Manul

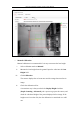
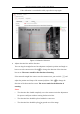
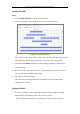
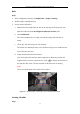
Table Of Contents
- Chapter 1 System Requirement
- Chapter 2 Network Connection
- Chapter 3 Access to the Network Camera
- Chapter 4 People Counting
- Chapter 5 Live View
- Chapter 6 Network Camera Configuration
- Chapter 7 Network Settings
- Chapter 8 Video/Audio Settings
- Chapter 9 Image Settings
- Chapter 10 Event Settings
- Chapter 11 Storage Settings
- Chapter 12 Playback
- Chapter 13 Picture
- Chapter 14 Application
- Appendix

Dual-Lens People Counting Camera User Manual
22
Rule
Steps:
1. Enter configuration interface: Configuration > People Counting
2. Enable people counting function.
3. Set up camera calibration.
a. Measure the lens height from the lens to the first step of the entry/exit area.
Input the value into the Lens Height from Entry/Exit Area field.
b. Click Calibration.
The camera displays the red count area and the orange detection line in
image.
c. Click and draw entry/exit area in image.
The drawn area should perfectly cover (neither too big nor too small) the first
step of the entry/exit area.
d. Adjust detection line and the direction.
You can drag the detection line and its endpoints to adjust its position and
length to better cover the entry/exit area. Click to change the direction of
the detection line arrow. The arrow stands for the direction of entering.
Note:
The arrow should point to the inside of the vehicle.
Figure 4-5 An Example of Detection Line and Entry/Exit Area
Arming Schedule
Steps: