
User Manual
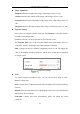
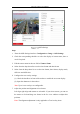

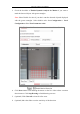
Table Of Contents
- Chapter 1 System Requirement
- Chapter 2 Network Connection
- Chapter 3 Access to the Network Camera
- Chapter 4 Wi-Fi Settings
- Chapter 5 Live View
- Chapter 6 Network Camera Configuration
- Chapter 7 Network Settings
- Chapter 8 Video/Audio Settings
- Chapter 9 Image Settings
- Chapter 10 Event Settings
- Chapter 11 People Counting
- Chapter 12 Storage Settings
- Chapter 13 Playback
- Chapter 14 Picture
- Chapter 15 Application
- Appendix

Network Camera User Manual
94
OSD Settings
Steps:
1. Enter the OSD Settings interface: Configuration > Image > OSD Settings.
2. Check the corresponding checkbox to select the display of camera name, date or
week if required.
3. Edit the camera name in the text field of Camera Name.
4. Select from the drop-down list to set the time format and date format.
5. Select from the drop-down list to set the time format, date format, display mode,
OSD size and OSD color.
6. Configure the text overlay settings.
(1) Check the checkbox in front of the textbox to enable the on-screen display.
(2) Input the characters in the textbox.
Note: Up to 8 text overlays are configurable.
7. Adjust the position and alignment of text frames.
Left align, right align and custom are selectable. If you select custom, you can use
the mouse to click and drag text frames in the live view window to adjust their
positions.
Note: The alignment adjustment is only applicable to Text Overlay items.