
User Manual
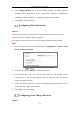
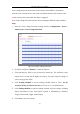
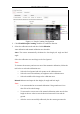
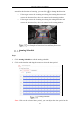
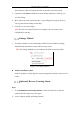
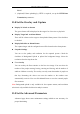
Table Of Contents
- Chapter 1 System Requirement
- Chapter 2 Network Connection
- Chapter 3 Access to the Network Camera
- Chapter 4 Wi-Fi Settings
- Chapter 5 Live View
- Chapter 6 Network Camera Configuration
- Chapter 7 Network Settings
- Chapter 8 Video/Audio Settings
- Chapter 9 Image Settings
- Chapter 10 Event Settings
- Chapter 11 People Counting
- Chapter 12 Storage Settings
- Chapter 13 Playback
- Chapter 14 Picture
- Chapter 15 Application
- Appendix

Network Camera User Manual
115
stands for the direction of entering, you can click to change the direction.
• If the target crosses the counting area along the entering direction and
crosses the detection line, then it is counted as the entering number.
• If the target crosses the counting area along the exiting direction and
crosses the detection line, then it is counted as the exiting number.
An Example of Detection Line and Entry/Exit Area
Arming Schedule
Steps:
1. Click Arming Schedule to edit the arming schedule.
2. Click on the time bar and drag the mouse to select the time period.
Arming Schedule
Note: Click on the selected time period, you can adjust the time period to the