
User Manual
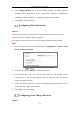
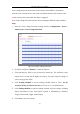
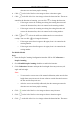
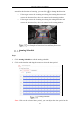
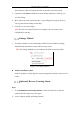
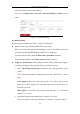
Table Of Contents
- Chapter 1 System Requirement
- Chapter 2 Network Connection
- Chapter 3 Access to the Network Camera
- Chapter 4 Wi-Fi Settings
- Chapter 5 Live View
- Chapter 6 Network Camera Configuration
- Chapter 7 Network Settings
- Chapter 8 Video/Audio Settings
- Chapter 9 Image Settings
- Chapter 10 Event Settings
- Chapter 11 People Counting
- Chapter 12 Storage Settings
- Chapter 13 Playback
- Chapter 14 Picture
- Chapter 15 Application
- Appendix

Network Camera User Manual
113
Figure 11-1 People Counting Configuration
2. Check Enable People Counting checkbox to enable the function.
3. Select the calibration mode and then click Calibration.
Auto calibration and manual calibration are selectable.
Auto: The camera automatically calculates the lens height, tilt angle and heel
angle.
Select the calibration area and drag it to the level ground.
Note:
To increase the accuracy and success rate of the automatic calibration, follow the
rule below to select the calibration area.
• Select the level ground with rich texture as the calibration area.
• Select the area with uniformity of brightness as the calibration area.
• Select the middle of the image as the calibration area.
Manual: Measure and input the lens height, tilt angle and heel angle.
Note:
• It is recommended to use manual calibration if the ground area is less
than 25% of the whole image.
• To increase the success rate of the manual calibration, make sure the lens
height is the true value in vertical direction between the lens and the
ground.
• After the area is successfully calibrated, then the camera generates the