
User Manual
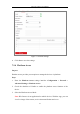
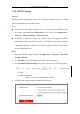
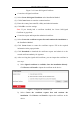
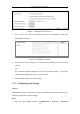
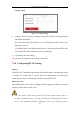
Table Of Contents
- Chapter 1 System Requirement
- Chapter 2 Network Connection
- Chapter 3 Access to the Network Camera
- Chapter 4 Wi-Fi Settings
- Chapter 5 Live View
- Chapter 6 Network Camera Configuration
- Chapter 7 Network Settings
- 7.1 Configuring Basic Settings
- 7.2 Configure Advanced Settings
- 7.2.1 Configuring SNMP Settings
- 7.2.2 Configuring FTP Settings
- 7.2.3 Configuring Email Settings
- 7.2.4 Platform Access
- 7.2.5 Wireless Dial
- 7.2.6 HTTPS Settings
- 7.2.7 Configuring QoS Settings
- 7.2.8 Configuring 802.1X Settings
- 7.2.9 Integration Protocol
- 7.2.10 Bandwidth Adaptation
- 7.2.11 Network Service
- 7.2.12 Smooth Streaming
- Chapter 8 Video/Audio Settings
- Chapter 9 Image Settings
- Chapter 10 Event Settings
- 10.1 Basic Events
- 10.2 Smart Events
- 10.2.1 Configuring Audio Exception Detection
- 10.2.2 Configuring Defocus Detection
- 10.2.3 Configuring Scene Change Detection
- 10.2.4 Configuring Face Detection
- 10.2.5 Configuring Intrusion Detection
- 10.2.6 Configuring Line Crossing Detection
- 10.2.7 Configuring Region Entrance Detection
- 10.2.8 Configuring Region Exiting Detection
- 10.2.9 Configuring Unattended Baggage Detection
- 10.2.10 Configuring Object Removal Detection
- 10.3 VCA Configuration
- Chapter 11 Storage Settings
- Chapter 12 Playback
- Chapter 13 Picture
- Chapter 14 Application
- Appendix

Network Camera User Manual
86
7.2.6 HTTPS Settings
Purpose:
HTTPS provides authentication of the web site and its associated web server, which
protects against Man-in-the-middle attacks.
Note:
For the camera that supports plug-in free live view, when you use HTTPS to visit
the camera, you should enable Websockets for live view. Go to Configuration >
Network > Advanced Settings > Network Service.
If HTTPS is enabled by default, the camera creates an unsigned certificate
automatically. When you visit the camera via HTTPS, the web browser will send
a notification about the certificate issue. Install a signed-certificate to the camera
to cancel the notification.
Steps:
1. Enter the HTTPS settings interface. Configuration > Network > Advanced
Settings > HTTPS.
2. Check Enable to access the camera via HTTP or HTTPS protocol.
3. Check Enable HTTPS Browsing to access the camera only via HTTPS protocol.
Figure 7-11 HTTPS Configuration Interface
4. Create the self-signed certificate or authorized certificate.