
User Manual
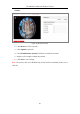
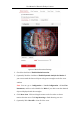
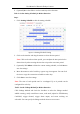
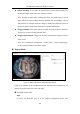
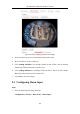
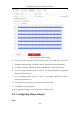
Table Of Contents
- Chapter 1 System Requirement
- Chapter 2 Network Connection
- Chapter 3 Access to the Network Camera
- Chapter 4 Live View
- Chapter 5 Network Camera Configuration
- Chapter 6 Network Settings
- Chapter 7 Video/Audio Settings
- Chapter 8 Configuring Image Parameters
- Chapter 9 Configuring Event Settings
- 9.1 Configuring Motion Detection
- 9.2 Configuring Video Tampering Alarm
- 9.3 Configuring Alarm Input
- 9.4 Configuring Alarm Output
- 9.5 Handling Exception
- 9.6 Configuring Audio Exception Detection
- 9.7 Configuring Intrusion Detection
- 9.8 Configuring Line Crossing Detection
- 9.9 Configuring Region Entrance Detection
- 9.10 Configuring Region Exiting Detection
- 9.11 Configuring Unattended Baggage Detection
- 9.12 Configuring Object Removal Detection
- Chapter 10 Storage Settings
- Chapter 11 People Counting
- Chapter 12 Heat Map
- Chapter 13 Intersection Analysis
- Chapter 14 Playback
- Chapter 15 Picture
- Chapter 16 Application
- Appendix

User Manual of Network Fisheye Camera
87
supported area number varies according to different camera models.
(2) Select OFF for Switch Day and Night Settings.
(3) Select the area by clicking the area No..
(4) Slide the cursor to adjust the sensitivity and proportion of object in the
area for the selected area.
Sensitivity: The greater the value is, the easier the alarm will be triggered.
Percentage: When the size of the moving object exceeds the set
percentage of the predefined area, the alarm will be triggered. The smaller
the percentage is, the easier the alarm will be triggered.
(5) Set the arming schedule and linkage method as in the normal
configuration mode.
(6) Click Save to save the settings.
Day/Night Auto-Switch
Steps:
(1) Draw the detection area as in the normal configuration mode. The
supported area varies according to the different camera models.
(2) Select Auto-Switch for Switch Day and Night Settings.
(3) Select the area by clicking the area No..
(4) Slide the cursor to adjust the sensitivity and proportion of object in the
area for the selected area in the daytime.
(5) Slide the cursor to adjust the sensitivity and proportion of object in the
area for the selected area at night.
(6) Set the arming schedule and linkage method as in the normal
configuration mode.
(7) Click Save to save the settings.
Day/Night Scheduled-Switch
Steps:
(1) Draw the detection area as in the normal configuration mode. The
supported area number varies according to different camera models.