
User Manual
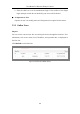

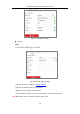
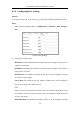
Table Of Contents
- Chapter 1 System Requirement
- Chapter 2 Network Connection
- Chapter 3 Access to the Network Camera
- Chapter 4 Live View
- Chapter 5 Network Camera Configuration
- Chapter 6 Network Settings
- Chapter 7 Video/Audio Settings
- Chapter 8 Configuring Image Parameters
- Chapter 9 Configuring Event Settings
- 9.1 Configuring Motion Detection
- 9.2 Configuring Video Tampering Alarm
- 9.3 Configuring Alarm Input
- 9.4 Configuring Alarm Output
- 9.5 Handling Exception
- 9.6 Configuring Audio Exception Detection
- 9.7 Configuring Intrusion Detection
- 9.8 Configuring Line Crossing Detection
- 9.9 Configuring Region Entrance Detection
- 9.10 Configuring Region Exiting Detection
- 9.11 Configuring Unattended Baggage Detection
- 9.12 Configuring Object Removal Detection
- Chapter 10 Storage Settings
- Chapter 11 People Counting
- Chapter 12 Heat Map
- Chapter 13 Intersection Analysis
- Chapter 14 Playback
- Chapter 15 Picture
- Chapter 16 Application
- Appendix

User Manual of Network Fisheye Camera
50
6.1.4 Configuring Port Settings
Purpose:
You can set the port No. of the camera, e.g., HTTP port, RTSP port and HTTPS port.
Steps:
1. Enter the Port Settings interface, Configuration > Network > Basic Settings >
Port
Figure 6-5 Port Settings
2. Set the ports of the camera.
HTTP Port: The default port number is 80, and it can be changed to any port No.
which is not occupied.
RTSP Port: The default port number is 554 and it can be changed to any port No.
ranges from 1 to 65535.
HTTPS Port: The default port number is 443, and it can be changed to any port
No. which is not occupied.
Server Port: The default server port number is 8000, and it can be changed to
any port No. ranges from 2000 to 65535.
Note:
When you use client software to visit the camera and you have changed the server
port number, you have to input the correct server port number in login interface to
access to the camera.
WebSocket Port: The default port number is 7681. It can be changed to any port