
User Manual

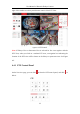
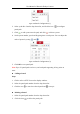
Table Of Contents
- Chapter 1 System Requirement
- Chapter 2 Network Connection
- Chapter 3 Access to the Network Camera
- Chapter 4 Live View
- Chapter 5 Network Camera Configuration
- Chapter 6 Network Settings
- Chapter 7 Video/Audio Settings
- Chapter 8 Configuring Image Parameters
- Chapter 9 Configuring Event Settings
- 9.1 Configuring Motion Detection
- 9.2 Configuring Video Tampering Alarm
- 9.3 Configuring Alarm Input
- 9.4 Configuring Alarm Output
- 9.5 Handling Exception
- 9.6 Configuring Audio Exception Detection
- 9.7 Configuring Intrusion Detection
- 9.8 Configuring Line Crossing Detection
- 9.9 Configuring Region Entrance Detection
- 9.10 Configuring Region Exiting Detection
- 9.11 Configuring Unattended Baggage Detection
- 9.12 Configuring Object Removal Detection
- Chapter 10 Storage Settings
- Chapter 11 People Counting
- Chapter 12 Heat Map
- Chapter 13 Intersection Analysis
- Chapter 14 Playback
- Chapter 15 Picture
- Chapter 16 Application
- Appendix

User Manual of Network Fisheye Camera
25
5. (Optional) you can click on other buttons to realize corresponding functions.
4.4.2 Setting/Calling/Deleting a Preset
Setting a Preset:
Purpose:
A preset for the fisheye camera is a predefined PTZ View which contains information
of pan, tilt, focus and other parameters.
Steps:
1. Click to select a PTZ View on the display window.
2. Click the direction/zoom buttons on the PTZ Control panel to adjust the PTZ
View as desired.
3. Select a preset number from the preset list.
4. Click the icon to save the current PTZ View as the preset.
The preset name turns from grey to black.
Figure 4-7 Setting a Preset
Note: Up to 256 presets are supported.
Calling a Preset:
Purpose: