
User Manual

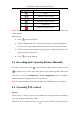
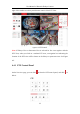
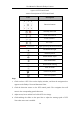
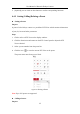
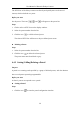
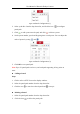
Table Of Contents
- Chapter 1 System Requirement
- Chapter 2 Network Connection
- Chapter 3 Access to the Network Camera
- Chapter 4 Live View
- Chapter 5 Network Camera Configuration
- Chapter 6 Network Settings
- Chapter 7 Video/Audio Settings
- Chapter 8 Configuring Image Parameters
- Chapter 9 Configuring Event Settings
- 9.1 Configuring Motion Detection
- 9.2 Configuring Video Tampering Alarm
- 9.3 Configuring Alarm Input
- 9.4 Configuring Alarm Output
- 9.5 Handling Exception
- 9.6 Configuring Audio Exception Detection
- 9.7 Configuring Intrusion Detection
- 9.8 Configuring Line Crossing Detection
- 9.9 Configuring Region Entrance Detection
- 9.10 Configuring Region Exiting Detection
- 9.11 Configuring Unattended Baggage Detection
- 9.12 Configuring Object Removal Detection
- Chapter 10 Storage Settings
- Chapter 11 People Counting
- Chapter 12 Heat Map
- Chapter 13 Intersection Analysis
- Chapter 14 Playback
- Chapter 15 Picture
- Chapter 16 Application
- Appendix

User Manual of Network Fisheye Camera
24
Figure 4-6 PTZ Control Panel
Table 4-5 Descriptions of PTZ Control Panel
Icon
Description
Direction buttons
/
Start/stop auto scan
Zoom out/Zoom in
Focus -/Focus +
Iris -/Iris +
Adjust speed of pan/tilt movements
Enable/disable light
Auxiliary Focus
Enable/disable wiper
Lens initialization
Start manual tracking
Start 3D zoom
Click to set presets
Click to set patrol
Steps:
1. Click to select a PTZ View on the display window, and then the navigation box
appears on the Fisheye View and Panorama View.
2. Click the direction arrows on the PTZ control panel. The navigation box will
move in the corresponding pan/tilt direction.
3. Adjust zoom, focus and iris level of the PTZ view image.
4. Click-and-drag the slider on the speed bar to adjust the moving speed of PTZ
View when auto scan is enabled.