
User Manual
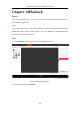
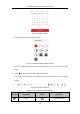
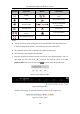
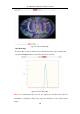
Table Of Contents
- Chapter 1 System Requirement
- Chapter 2 Network Connection
- Chapter 3 Access to the Network Camera
- Chapter 4 Live View
- Chapter 5 Network Camera Configuration
- Chapter 6 Network Settings
- Chapter 7 Video/Audio Settings
- Chapter 8 Configuring Image Parameters
- Chapter 9 Configuring Event Settings
- 9.1 Configuring Motion Detection
- 9.2 Configuring Video Tampering Alarm
- 9.3 Configuring Alarm Input
- 9.4 Configuring Alarm Output
- 9.5 Handling Exception
- 9.6 Configuring Audio Exception Detection
- 9.7 Configuring Intrusion Detection
- 9.8 Configuring Line Crossing Detection
- 9.9 Configuring Region Entrance Detection
- 9.10 Configuring Region Exiting Detection
- 9.11 Configuring Unattended Baggage Detection
- 9.12 Configuring Object Removal Detection
- Chapter 10 Storage Settings
- Chapter 11 People Counting
- Chapter 12 Heat Map
- Chapter 13 Intersection Analysis
- Chapter 14 Playback
- Chapter 15 Picture
- Chapter 16 Application
- Appendix

User Manual of Network Fisheye Camera
124
Button
Operation
Button
Operation
Pause
/
Start/Stop clipping video
files
Stop
Playback by frame
Slow Forward
/
Audio on and adjust
volume/Mute
Fast Forward
Download
/
Enable/Disable digital
zoom
Stop all playback
Play with full screen
Notes:
You can set the local file saving path for the downloaded video files and pictures
in Local Configuration interface. For details, please refer to Section 5.1.
The playback mode varies according to the different mount type.
PTZ function is also supported in playback.
5. Drag the progress bar with the mouse to locate the exact playback point. You can
also input the time and click to locate the playback point in the Set
playback time field. You can also click to zoom out/in the progress bar.
Figure 14-5 Set Playback Time
Figure 14-6 Progress Bar
Different video types are marked in different colors on the progress bar.
Figure 14-7 Video Types