
User Manual


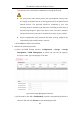
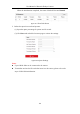

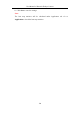
Table Of Contents
- Chapter 1 System Requirement
- Chapter 2 Network Connection
- Chapter 3 Access to the Network Camera
- Chapter 4 Live View
- Chapter 5 Network Camera Configuration
- Chapter 6 Network Settings
- Chapter 7 Video/Audio Settings
- Chapter 8 Configuring Image Parameters
- Chapter 9 Configuring Event Settings
- 9.1 Configuring Motion Detection
- 9.2 Configuring Video Tampering Alarm
- 9.3 Configuring Alarm Input
- 9.4 Configuring Alarm Output
- 9.5 Handling Exception
- 9.6 Configuring Audio Exception Detection
- 9.7 Configuring Intrusion Detection
- 9.8 Configuring Line Crossing Detection
- 9.9 Configuring Region Entrance Detection
- 9.10 Configuring Region Exiting Detection
- 9.11 Configuring Unattended Baggage Detection
- 9.12 Configuring Object Removal Detection
- Chapter 10 Storage Settings
- Chapter 11 People Counting
- Chapter 12 Heat Map
- Chapter 13 Intersection Analysis
- Chapter 14 Playback
- Chapter 15 Picture
- Chapter 16 Application
- Appendix

User Manual of Network Fisheye Camera
112
the events, including motion detection, alarm input, line crossing detection
and intrusion detection. For details, please refer to Section 5.6.
(4) Select the picture format, resolution, quality, capture interval, and capture
number.
5. Set the time interval between two snapshots.
6. Click Save to save the settings.
7. (Optional) To upload the captured pictures to the FTP server, configure the FTP
parameters and check Upload Picture checkbox in FTP Settings interface. For
details, please refer to Section 5.3.7 Configuring FTP Settings.
10.3 Configuring Net HDD
Before you start:
The network disk should be available within the network and properly configured to
store the recorded files, log files, etc.
Steps:
1. Add Net HDD.
(1) Enter the Net HDD settings interface, Configuration > Storage > Storage
Management > Net HDD.
Figure 10-5 Add Network Disk
(2) Enter the IP address of the network disk, and enter the file path.
(3) Select the mounting type. NFS and SMB/CIFS are selectable. And you can set
the user name and password to guarantee the security if SMB/CIFS is
selected.