
User Manual
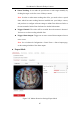
Table Of Contents
- Chapter 1 System Requirement
- Chapter 2 Network Connection
- Chapter 3 Access to the Network Camera
- Chapter 4 Live View
- Chapter 5 Network Camera Configuration
- 5.1 Configuring Local Parameters
- 5.2 Configuring System Settings
- 5.2.1 Viewing Basic Information
- 5.2.2 Time and DST Settings
- 5.2.3 RS-232 Settings
- 5.2.4 RS-485 Settings
- 5.2.5 Upgrade and Maintenance
- 5.2.6 Log Searching
- 5.2.7 System Service Settings
- 5.2.8 Authentication
- 5.2.9 IP Address Filter
- 5.2.10 Security Service
- 5.2.11 User Management
- 5.2.12 Open Source Software License
- 5.3 Configuring Network Settings
- 5.3.1 Configuring TCP/IP Settings
- 5.3.2 Configuring Port Settings
- 5.3.3 Configuring PPPoE Settings
- 5.3.4 Configuring DDNS Settings
- 5.3.5 Configuring NAT (Network Address Translation) Settings
- 5.3.6 Configuring SNMP Settings
- 5.3.7 Configuring FTP Settings
- 5.3.8 Email Settings
- 5.3.9 Configuring HTTPS Settings
- 5.3.10 Configuring QoS Settings
- 5.3.11 Configuring 802.1X Settings
- 5.4 Configuring Video and Audio Settings
- 5.5 Configuring Image Parameters
- 5.6 Configuring Event Settings
- 5.7 Configuring Heat Map
- Chapter 6 Storage Settings
- Chapter 7 Playback
- Chapter 8 Picture
- Chapter 9 Application
- Appendix

User Manual of Network Fisheye Camera
89
(7) Click Save to save the settings.
● Day/Night Scheduled-Switch
Steps:
(1) Draw the detection area as in the normal configuration mode. The
supported area number varies according to different camera models.
(2) Select Scheduled-Switch for Switch Day and Night Settings.
(3) Select the start time and end time for the switching timing.
(4) Select the area by clicking the area No..
(5) Slide the cursor to adjust the sensitivity and proportion of object in the
area for the selected area in the daytime.
(6) Slide the cursor to adjust the sensitivity and proportion of object in the
area for the selected area at night.
(7) Set the arming schedule and linkage method as in the normal
configuration mode.
(8) Click Save to save the settings.
5.6.2 Configuring Video Tampering Alarm
Purpose:
You can configure the camera to trigger the alarm when the lens is covered and take
alarm response action.
Note: Video Tampering Detection is not supported when the decoding mode is
hardware decoding and the display mode is 180 Panorama View or 4PTZ.
Steps:
1. Enter the Tamper-proof Settings interface:
Configuration > Event > Basic Event > Video Tampering
2. Check the checkbox of Enable Video Tampering to enable video tampering
detection function.