
User Manual
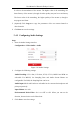


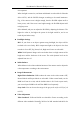
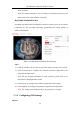
Table Of Contents
- Chapter 1 System Requirement
- Chapter 2 Network Connection
- Chapter 3 Access to the Network Camera
- Chapter 4 Live View
- Chapter 5 Network Camera Configuration
- 5.1 Configuring Local Parameters
- 5.2 Configuring System Settings
- 5.2.1 Viewing Basic Information
- 5.2.2 Time and DST Settings
- 5.2.3 RS-232 Settings
- 5.2.4 RS-485 Settings
- 5.2.5 Upgrade and Maintenance
- 5.2.6 Log Searching
- 5.2.7 System Service Settings
- 5.2.8 Authentication
- 5.2.9 IP Address Filter
- 5.2.10 Security Service
- 5.2.11 User Management
- 5.2.12 Open Source Software License
- 5.3 Configuring Network Settings
- 5.3.1 Configuring TCP/IP Settings
- 5.3.2 Configuring Port Settings
- 5.3.3 Configuring PPPoE Settings
- 5.3.4 Configuring DDNS Settings
- 5.3.5 Configuring NAT (Network Address Translation) Settings
- 5.3.6 Configuring SNMP Settings
- 5.3.7 Configuring FTP Settings
- 5.3.8 Email Settings
- 5.3.9 Configuring HTTPS Settings
- 5.3.10 Configuring QoS Settings
- 5.3.11 Configuring 802.1X Settings
- 5.4 Configuring Video and Audio Settings
- 5.5 Configuring Image Parameters
- 5.6 Configuring Event Settings
- 5.7 Configuring Heat Map
- Chapter 6 Storage Settings
- Chapter 7 Playback
- Chapter 8 Picture
- Chapter 9 Application
- Appendix

User Manual of Network Fisheye Camera
76
Saturation describes the colorfulness of the image color, which ranges from
1 to 100, and the default value is 50.
Sharpness describes the edge contrast of the image, which ranges from 1 to
100, and the default value is 50.
Exposure Settings
Iris Mode: If the camera is equipped with the fixed lens, only Manual is
selectable, and the iris mode is not configurable.
If Auto is selected, you can set the auto iris level from 0 to 100.
Exposure Time: It refers to the electronic shutter time, which ranges from
1/3 to 1/100,000s. Adjust it according to the actual luminance condition.
Gain: Gain of the image can also be manually configured from 0 to 100. The
bigger the value is, the brighter would the image be, and the noise would also
be amplified to a larger extent.
Day/Night Switch
Select the day/night switch mode, and configure the smart supplement light
settings from this option.
Day: the camera stays at day mode.
Night: the camera stays at night mode.
Auto: the camera switches between the day mode and the night mode
according to the illumination automatically. The sensitivity ranges from 0 to
7, the higher the value is, the easier the mode switches. The filtering time
refers to the time interval between the day/night switch. You can set it from
5s to 120s.
Schedule: The camera switches between the day mode and the night mode
according to the configured time period.
Triggered by Alarm Input: The camera switches to the day mode or the
night mode after the alarm is triggered.
Smart Supplement Light: Smart Supplement Light function gives user an
option to adjust the power of the IR LED, thus avoiding image