
User Manual
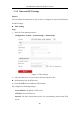
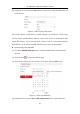
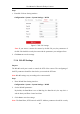
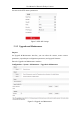
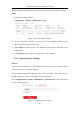
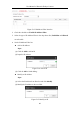
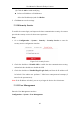
Table Of Contents
- Chapter 1 System Requirement
- Chapter 2 Network Connection
- Chapter 3 Access to the Network Camera
- Chapter 4 Live View
- Chapter 5 Network Camera Configuration
- 5.1 Configuring Local Parameters
- 5.2 Configuring System Settings
- 5.2.1 Viewing Basic Information
- 5.2.2 Time and DST Settings
- 5.2.3 RS-232 Settings
- 5.2.4 RS-485 Settings
- 5.2.5 Upgrade and Maintenance
- 5.2.6 Log Searching
- 5.2.7 System Service Settings
- 5.2.8 Authentication
- 5.2.9 IP Address Filter
- 5.2.10 Security Service
- 5.2.11 User Management
- 5.2.12 Open Source Software License
- 5.3 Configuring Network Settings
- 5.3.1 Configuring TCP/IP Settings
- 5.3.2 Configuring Port Settings
- 5.3.3 Configuring PPPoE Settings
- 5.3.4 Configuring DDNS Settings
- 5.3.5 Configuring NAT (Network Address Translation) Settings
- 5.3.6 Configuring SNMP Settings
- 5.3.7 Configuring FTP Settings
- 5.3.8 Email Settings
- 5.3.9 Configuring HTTPS Settings
- 5.3.10 Configuring QoS Settings
- 5.3.11 Configuring 802.1X Settings
- 5.4 Configuring Video and Audio Settings
- 5.5 Configuring Image Parameters
- 5.6 Configuring Event Settings
- 5.7 Configuring Heat Map
- Chapter 6 Storage Settings
- Chapter 7 Playback
- Chapter 8 Picture
- Chapter 9 Application
- Appendix

User Manual of Network Fisheye Camera
45
Rebooting the Camera
Click Reboot to reboot the network camera.
Restoring Default Settings
Click Restore or Default to restore the default settings.
Note: After restoring the default settings, the IP address is also restored to the
default IP address, please be careful for this action.
Exporting/Importing Configuration File
Purpose:
Configuration file is used for the batch configuration of the camera, which can
simplify the configuration steps when there are a lot of cameras needing
configuring.
Steps:
1. Click Export to export the current configuration file, and save it to the
certain place.
2. Click Browse to select the saved configuration file and then click Import to
start importing configuration file.
Note: You need to reboot the camera after importing configuration file.
Upgrading the System
Click Browse to select the local upgrade file and then click Upgrade to start
remote upgrade.
Note: The upgrading process will take 1 to 10 minutes. Please don't disconnect
power of the camera during the process. The camera reboots automatically after
upgrading.
5.2.6 Log Searching
Purpose:
The operation, alarm, exception and information of the camera are stored in log files.
You can also export the log files.
Before you start: