
User Manual
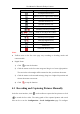

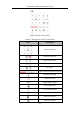
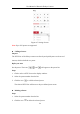
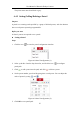
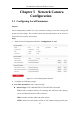
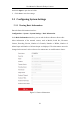
Table Of Contents
- Chapter 1 System Requirement
- Chapter 2 Network Connection
- Chapter 3 Access to the Network Camera
- Chapter 4 Live View
- Chapter 5 Network Camera Configuration
- 5.1 Configuring Local Parameters
- 5.2 Configuring System Settings
- 5.2.1 Viewing Basic Information
- 5.2.2 Time and DST Settings
- 5.2.3 RS-232 Settings
- 5.2.4 RS-485 Settings
- 5.2.5 Upgrade and Maintenance
- 5.2.6 Log Searching
- 5.2.7 System Service Settings
- 5.2.8 Authentication
- 5.2.9 IP Address Filter
- 5.2.10 Security Service
- 5.2.11 User Management
- 5.2.12 Open Source Software License
- 5.3 Configuring Network Settings
- 5.3.1 Configuring TCP/IP Settings
- 5.3.2 Configuring Port Settings
- 5.3.3 Configuring PPPoE Settings
- 5.3.4 Configuring DDNS Settings
- 5.3.5 Configuring NAT (Network Address Translation) Settings
- 5.3.6 Configuring SNMP Settings
- 5.3.7 Configuring FTP Settings
- 5.3.8 Email Settings
- 5.3.9 Configuring HTTPS Settings
- 5.3.10 Configuring QoS Settings
- 5.3.11 Configuring 802.1X Settings
- 5.4 Configuring Video and Audio Settings
- 5.5 Configuring Image Parameters
- 5.6 Configuring Event Settings
- 5.7 Configuring Heat Map
- Chapter 6 Storage Settings
- Chapter 7 Playback
- Chapter 8 Picture
- Chapter 9 Application
- Appendix

User Manual of Network Fisheye Camera
30
Icon
Description
Set aspect ratio as 16:9.
Window size for original video stream.
Self-adaptive window size.
Window division, 1x1.
Window division, 2x2.
Window division, 3x3.
/
Manually start/stop recording.
Audio on and adjust the volume.
Mute.
/
Start/stop two-way audio.
/
Start/stop digital zoom).
Manually capture a picture.
Full screen.
/
Show/hide the PTZ panel.
Notes:
● Toolbar icons on the live view page vary according to decoding modes and
camera models.
● Digital Zoom:
1) Click to start the function.
2) Click the mouse on the live view image and drag it to a lower right position.
The area in the red rectangle will be zoomed in after you release the mouse.
3) Click the mouse on the zoomed-in image, drag it to a higher left position and
release the mouse to zoom out.
4) Click to stop the function.
4.3 Recording and Capturing Pictures Manually
In the live view interface, click on the toolbar to capture the live pictures or click
to record the live video. The saving paths of the captured pictures and record
files can be set on the Configuration > Local Configuration page. To configure