
User Manual
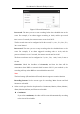
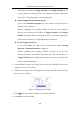
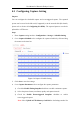
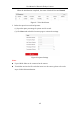
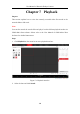
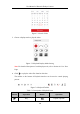
Table Of Contents
- Chapter 1 System Requirement
- Chapter 2 Network Connection
- Chapter 3 Access to the Network Camera
- Chapter 4 Live View
- Chapter 5 Network Camera Configuration
- 5.1 Configuring Local Parameters
- 5.2 Configuring System Settings
- 5.2.1 Viewing Basic Information
- 5.2.2 Time and DST Settings
- 5.2.3 RS-232 Settings
- 5.2.4 RS-485 Settings
- 5.2.5 Upgrade and Maintenance
- 5.2.6 Log Searching
- 5.2.7 System Service Settings
- 5.2.8 Authentication
- 5.2.9 IP Address Filter
- 5.2.10 Security Service
- 5.2.11 User Management
- 5.2.12 Open Source Software License
- 5.3 Configuring Network Settings
- 5.3.1 Configuring TCP/IP Settings
- 5.3.2 Configuring Port Settings
- 5.3.3 Configuring PPPoE Settings
- 5.3.4 Configuring DDNS Settings
- 5.3.5 Configuring NAT (Network Address Translation) Settings
- 5.3.6 Configuring SNMP Settings
- 5.3.7 Configuring FTP Settings
- 5.3.8 Email Settings
- 5.3.9 Configuring HTTPS Settings
- 5.3.10 Configuring QoS Settings
- 5.3.11 Configuring 802.1X Settings
- 5.4 Configuring Video and Audio Settings
- 5.5 Configuring Image Parameters
- 5.6 Configuring Event Settings
- 5.7 Configuring Heat Map
- Chapter 6 Storage Settings
- Chapter 7 Playback
- Chapter 8 Picture
- Chapter 9 Application
- Appendix

User Manual of Network Fisheye Camera
101
Figure 6-2 Record Parameters
Pre-record: The time you set to start recording before the scheduled time or the
event. For example, if an alarm triggers recording at 10:00, and the pre-record
time is set as 5 seconds, the camera starts to record at 9:59:55.
The Pre-record time can be configured as No Pre-record, 5 s, 10 s, 15 s, 20 s, 25 s,
30 s or not limited.
Post-record: The time you set to stop recording after the scheduled time or the
event. For example, if an alarm triggered recording ends at 11:00, and the
post-record time is set as 5 seconds, the camera records until 11:00:05.
The Post-record time can be configured as 5 s, 10 s, 30 s, 1 min, 2 min, 5 min or
10 min.
Overwrite: Check the checkbox of Overwrite, and then the data will be
overwritten when HDD or network disk becomes full. If you uncheck it, the
recording will stop when HDD or network disk becomes full.
Note:
The local storage (SD card/micro SD card) doesn’t support overwrite function.
Recording Stream: Set the stream type for recording. Main Stream and Sub
Stream are selectable.
4. Select record type from the drop-down list. Continuous, Motion, Alarm, Motion |
Alarm, Motion & Alarm, and Event are selectable.
Continuous
If you select continuous, the video will be recorded automatically according
to the time of the schedule.