
User Manual
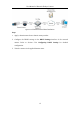


Table Of Contents
- Chapter 1 System Requirement
- Chapter 2 Network Connection
- Chapter 3 Access to the Network Camera
- Chapter 4 Live View
- Chapter 5 Network Camera Configuration
- Chapter 6 Network Settings
- Chapter 7 Video/Audio Settings
- Chapter 8 Configuring Image Parameters
- Chapter 9 Configuring Event Settings
- 9.1 Configuring Motion Detection
- 9.2 Configuring Video Tampering Alarm
- 9.3 Configuring Alarm Input
- 9.4 Configuring Alarm Output
- 9.5 Handling Exception
- 9.6 Configuring Audio Exception Detection
- 9.7 Configuring Intrusion Detection
- 9.8 Configuring Line Crossing Detection
- 9.9 Configuring Region Entrance Detection
- 9.10 Configuring Region Exiting Detection
- 9.11 Configuring Unattended Baggage Detection
- 9.12 Configuring Object Removal Detection
- Chapter 10 Storage Settings
- Chapter 11 People Counting
- Chapter 12 Heat Map
- Chapter 13 Intersection Analysis
- Chapter 14 Playback
- Chapter 15 Picture
- Chapter 16 Application
- Appendix

User Manual of Network Fisheye Camera
11
1. Connect the network camera to the router.
2. In the camera, assign a LAN IP address, the subnet mask and the gateway. Refer
to Section 2.1.2 for detailed IP address configuration of the network camera.
3. In the router, set the PPPoE user name, password and confirm the password.
4. Set port mapping. E.g. 80, 8000, and 554 ports. The steps for port mapping vary
depending on different routers. Please call the router manufacturer for assistance
with port mapping.
Note: Refer to Appendix 2 for detailed information about port mapping.
5. Apply a domain name from a domain name provider.
6. Configure the DDNS settings in the setting interface of the router.
7. Visit the camera via the applied domain name.
Connecting the network camera via a modem
Purpose:
This camera supports the PPPoE auto dial-up function. The camera gets a public IP
address by ADSL dial-up after the camera is connected to a modem. You need to
configure the PPPoE parameters of the network camera. Refer to Section 5.3.3
Configuring PPPoE Settings for detailed configuration.
Figure 2-12 Accessing the Camera with Dynamic IP
Note: The obtained IP address is dynamically assigned via PPPoE, so the IP address
always changes after rebooting the camera. To solve the inconvenience of the
dynamic IP, you need to get a domain name from the DDNS provider (E.g.
DynDns.com). Please follow the steps below for normal domain name resolution and
private domain name resolution to solve the problem.
Normal Domain Name Resolution