
User Manual
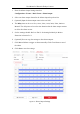

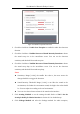
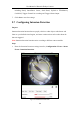

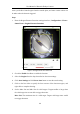
Table Of Contents
- Chapter 1 System Requirement
- Chapter 2 Network Connection
- Chapter 3 Access to the Network Camera
- Chapter 4 Live View
- Chapter 5 Network Camera Configuration
- Chapter 6 Network Settings
- Chapter 7 Video/Audio Settings
- Chapter 8 Configuring Image Parameters
- Chapter 9 Configuring Event Settings
- 9.1 Configuring Motion Detection
- 9.2 Configuring Video Tampering Alarm
- 9.3 Configuring Alarm Input
- 9.4 Configuring Alarm Output
- 9.5 Handling Exception
- 9.6 Configuring Audio Exception Detection
- 9.7 Configuring Intrusion Detection
- 9.8 Configuring Line Crossing Detection
- 9.9 Configuring Region Entrance Detection
- 9.10 Configuring Region Exiting Detection
- 9.11 Configuring Unattended Baggage Detection
- 9.12 Configuring Object Removal Detection
- Chapter 10 Storage Settings
- Chapter 11 People Counting
- Chapter 12 Heat Map
- Chapter 13 Intersection Analysis
- Chapter 14 Playback
- Chapter 15 Picture
- Chapter 16 Application
- Appendix

User Manual of Network Fisheye Camera
98
as A<->B, A ->B, and B->A.
A<->B: The object going across the plane with both directions can be detected and
alarms are triggered.
A->B: Only the object crossing the configured line from the A side to the B side
can be detected.
B->A: Only the object crossing the configured line from the B side to the A side
can be detected.
8. Click Stop Drawing when finish drawing.
9. Drag the slider to set the sensitivity value.
Sensitivity: Range [1-100]. It stands for the percentage of the body part of an
acceptable target that goes across the pre-defined line.
Sensitivity = 100 – S
1
/S
T
*100
S
1
stands for the target body part that goes across the pre-defined line. S
T
stands
for the complete target body.
Example: if you set the value as 60, the action can be counted as a line crossing
action only when 40 percent or more body part goes across the line.
Note: The Sensitivity of the detection is supported by certain models. Refer to
actual display for details.
10. Repeat the above steps to configure other lines. Up to 4 lines can be set. You can
click the Clear button to clear all pre-defined lines.
11. Click the Arming Schedule to set the arming schedule.
12. Select the linkage methods for line crossing detection, including Notify
Surveillance Center, Send Email, Upload to FTP/Memory Card/NAS, Trigger
Channel and Trigger Alarm Output.
13. Click Save to save the settings.
9.9 Configuring Region Entrance Detection
Purpose:
Region entrance detection function detects people, vehicle or other objects which