
Manual

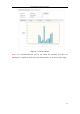

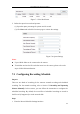


Table Of Contents
- Chapter 1 System Requirement
- Chapter 2 Network Connection
- Chapter 3 Access to the Network Camera
- Chapter 4 Wi-Fi Settings
- Chapter 5 Live View
- Chapter 6 Network Camera Configuration
- 6.1 Configuring Local Parameters
- 6.2 Configuring Time Settings
- 6.3 Configuring Network Settings
- 6.3.1 Configuring TCP/IP Settings
- 6.3.2 Configuring Port Settings
- 6.3.3 Configuring PPPoE Settings
- 6.3.4 Configuring DDNS Settings
- 6.3.5 Configuring SNMP Settings
- 6.3.6 Configuring 802.1X Settings
- 6.3.7 Configuring QoS Settings
- 6.3.8 Configuring UPnP™ Settings
- 6.3.9 Configuring Wireless Dial Settings
- 6.3.10 Email Sending Triggered by Alarm
- 6.3.11 Configuring NAT (Network Address Translation) Settings
- 6.3.12 Configuring FTP Settings
- 6.3.13 Platform Access
- 6.3.14 HTTPS Settings
- 6.4 Configuring Video and Audio Settings
- 6.5 Configuring Image Parameters
- 6.6 Configuring and Handling Alarms
- 6.6.1 Configuring Motion Detection
- 6.6.2 Configuring Video Tampering Alarm
- 6.6.3 Configuring Alarm Input
- 6.6.4 Configuring Alarm Output
- 6.6.5 Handling Exception
- 6.6.6 Configuring Other Alarm
- 6.6.7 Configuring Audio Exception Detection
- 6.6.8 Configuring Defocus Detection
- 6.6.9 Configuring Scene Change Detection
- 6.6.10 Configuring Face Detection
- 6.6.11 Configuring Line Crossing Detection
- 6.6.12 Configuring Intrusion Detection
- 6.6.13 Configuring Region Entrance Detection
- 6.6.14 Configuring Region Exiting Detection
- 6.6.15 Configuring Unattended Baggage Detection
- 6.6.16 Configuring Object Removal Detection
- 6.7 VCA Configuration
- Chapter 7 Storage Settings
- Chapter 8 Counting
- Chapter 9 Road Traffic
- Chapter 10 Playback
- Chapter 11 Log Searching
- Chapter 12 Others
- Appendix

User Manual of Network Camera
130
The Post-record time can be configured as 5 s, 10 s, 30 s, 1 min, 2 min, 5 min
or 10 min.
Note: The record parameter configurations vary depending on the camera model.
4. Click Edit to edit the record schedule.
Figure 7-7 Record Schedule
5. Choose the day to set the record schedule.
(1) Set all-day record or segment record:
If you want to configure the all-day recording, please check the All Day
checkbox.
If you want to record in different time sections, check the Customize
checkbox. Set the Start Time and End Time.
Note: The time of each segment can’t be overlapped. Up to 4 segments can
be configured.
(2) Select a Record Type. The record type can be Continuous, Motion Detection,
Alarm, Motion | Alarm, Motion & Alarm, PIR Alarm, Wireless Alarm,
Emergency Alarm, or Motion | Alarm Input | PIR | Wireless | Emergency.
Continuous
If you select Continuous, the video will be recorded automatically according