
User Manual
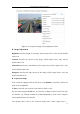
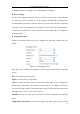
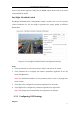
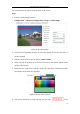
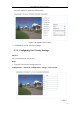
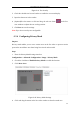
Table Of Contents
- Chapter 1 System Requirement
- Chapter 2 Network Connection
- Chapter 3 Access to the Network Camera
- Chapter 4 Wi-Fi Settings
- Chapter 5 Live View
- Chapter 6 Network Camera Configuration
- 6.1 Configuring Local Parameters
- 6.2 Configuring Time Settings
- 6.3 Configuring Network Settings
- 6.3.1 Configuring TCP/IP Settings
- 6.3.2 Configuring Port Settings
- 6.3.3 Configuring PPPoE Settings
- 6.3.4 Configuring DDNS Settings
- 6.3.5 Configuring SNMP Settings
- 6.3.6 Configuring 802.1X Settings
- 6.3.7 Configuring QoS Settings
- 6.3.8 Configuring UPnP™ Settings
- 6.3.9 Configuring Wireless Dial Settings
- 6.3.10 Email Sending Triggered by Alarm
- 6.3.11 Configuring NAT (Network Address Translation) Settings
- 6.3.12 Configuring FTP Settings
- 6.3.13 Platform Access
- 6.3.14 HTTPS Settings
- 6.4 Configuring Video and Audio Settings
- 6.5 Configuring Image Parameters
- 6.6 Configuring and Handling Alarms
- 6.6.1 Configuring Motion Detection
- 6.6.2 Configuring Video Tampering Alarm
- 6.6.3 Configuring Alarm Input
- 6.6.4 Configuring Alarm Output
- 6.6.5 Handling Exception
- 6.6.6 Configuring Other Alarm
- 6.6.7 Configuring Audio Exception Detection
- 6.6.8 Configuring Defocus Detection
- 6.6.9 Configuring Scene Change Detection
- 6.6.10 Configuring Face Detection
- 6.6.11 Configuring Line Crossing Detection
- 6.6.12 Configuring Intrusion Detection
- 6.6.13 Configuring Region Entrance Detection
- 6.6.14 Configuring Region Exiting Detection
- 6.6.15 Configuring Unattended Baggage Detection
- 6.6.16 Configuring Object Removal Detection
- 6.7 VCA Configuration
- Chapter 7 Storage Settings
- Chapter 8 Counting
- Chapter 9 Road Traffic
- Chapter 10 Playback
- Chapter 11 Log Searching
- Chapter 12 Others
- Appendix

User Manual of Network Camera
74
1/100,000s. Adjust it according to the actual luminance condition.
Focus Settings
For the camera supports electronic lens, you can set the focus mode as Auto, Manual
or Semi-auto. If auto is selected, the focus is adjusted automatically according to the
actual monitoring scenario; if manual is selected, you can control the lens by adjusting
the zoom, focus, lens initialization, and auxiliary focus via the PTZ control interface;
if semi-auto is selected, the camera will focus automatically when you adjust the
zoom parameters.
Day/Night Switch
Select the day/night switch mode, and configure the smart IR settings from this
option.
Figure 6-35 Day/Night Switch
Day, night, auto, schedule, and triggered by alarm input are selectable for day/night
switch.
Day: the camera stays at day mode.
Night: the camera stays at night mode.
Auto: the camera switches between the day mode and the night mode according to the
illumination automatically. The sensitivity ranges from 0~7, the higher the value is,
the easier the mode switches. The filtering time refers to the interval time between the
day/night switch. You can set it from 5s to 120s.
Schedule: Set the start time and the end time to define the duration for day/night
mode.
Triggered by alarm input: The switch is triggered by alarm input, and you can set