
User Manual

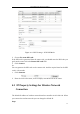

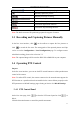
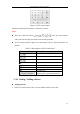
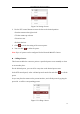
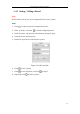
Table Of Contents
- Chapter 1 System Requirement
- Chapter 2 Network Connection
- Chapter 3 Access to the Network Camera
- Chapter 4 Wi-Fi Settings
- Chapter 5 Live View
- Chapter 6 Network Camera Configuration
- 6.1 Configuring Local Parameters
- 6.2 Configuring Time Settings
- 6.3 Configuring Network Settings
- 6.3.1 Configuring TCP/IP Settings
- 6.3.2 Configuring Port Settings
- 6.3.3 Configuring PPPoE Settings
- 6.3.4 Configuring DDNS Settings
- 6.3.5 Configuring SNMP Settings
- 6.3.6 Configuring 802.1X Settings
- 6.3.7 Configuring QoS Settings
- 6.3.8 Configuring UPnP™ Settings
- 6.3.9 Configuring Wireless Dial Settings
- 6.3.10 Email Sending Triggered by Alarm
- 6.3.11 Configuring NAT (Network Address Translation) Settings
- 6.3.12 Configuring FTP Settings
- 6.3.13 Platform Access
- 6.3.14 HTTPS Settings
- 6.4 Configuring Video and Audio Settings
- 6.5 Configuring Image Parameters
- 6.6 Configuring and Handling Alarms
- 6.6.1 Configuring Motion Detection
- 6.6.2 Configuring Video Tampering Alarm
- 6.6.3 Configuring Alarm Input
- 6.6.4 Configuring Alarm Output
- 6.6.5 Handling Exception
- 6.6.6 Configuring Other Alarm
- 6.6.7 Configuring Audio Exception Detection
- 6.6.8 Configuring Defocus Detection
- 6.6.9 Configuring Scene Change Detection
- 6.6.10 Configuring Face Detection
- 6.6.11 Configuring Line Crossing Detection
- 6.6.12 Configuring Intrusion Detection
- 6.6.13 Configuring Region Entrance Detection
- 6.6.14 Configuring Region Exiting Detection
- 6.6.15 Configuring Unattended Baggage Detection
- 6.6.16 Configuring Object Removal Detection
- 6.7 VCA Configuration
- Chapter 7 Storage Settings
- Chapter 8 Counting
- Chapter 9 Road Traffic
- Chapter 10 Playback
- Chapter 11 Log Searching
- Chapter 12 Others
- Appendix

User Manual of Network Camera
32
2. Choose the connection mode as PBC.
Note: Support of this mode is mandatory for both the Access Points and the
connecting devices.
3. Check on the Wi-Fi router to see if there is a WPS button. If yes push the button
and you can see the indicator near the button start flashing, which means the WPS
function of the router is enabled. For detailed operation, please see the user guide of
the router.
4. Push the WPS button to enable the function on the camera.
If there is not a WPS button on the camera, you can also click the virtual button to
enable the PBC function on the web interface.
5. Click Connect button.
When the PBC mode is both enabled in the router and the camera, the camera and the
wireless network is connected automatically.
PIN Mode:
The PIN mode requires a Personal Identification Number (PIN) to be read from either
a sticker or the display on the new wireless device. This PIN must then be entered to
connect the network, usually the Access Point of the network.
Steps:
1. Choose a wireless connection on the list and the SSID is shown.