
User Manual
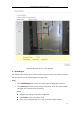
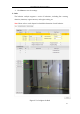

Table Of Contents
- Chapter 1 System Requirement
- Chapter 2 Network Connection
- Chapter 3 Access to the Network Camera
- Chapter 4 Wi-Fi Settings
- Chapter 5 Live View
- Chapter 6 Network Camera Configuration
- 6.1 Configuring Local Parameters
- 6.2 Configuring Time Settings
- 6.3 Configuring Network Settings
- 6.3.1 Configuring TCP/IP Settings
- 6.3.2 Configuring Port Settings
- 6.3.3 Configuring PPPoE Settings
- 6.3.4 Configuring DDNS Settings
- 6.3.5 Configuring SNMP Settings
- 6.3.6 Configuring 802.1X Settings
- 6.3.7 Configuring QoS Settings
- 6.3.8 Configuring UPnP™ Settings
- 6.3.9 Configuring Wireless Dial Settings
- 6.3.10 Email Sending Triggered by Alarm
- 6.3.11 Configuring NAT (Network Address Translation) Settings
- 6.3.12 Configuring FTP Settings
- 6.3.13 Platform Access
- 6.3.14 HTTPS Settings
- 6.4 Configuring Video and Audio Settings
- 6.5 Configuring Image Parameters
- 6.6 Configuring and Handling Alarms
- 6.6.1 Configuring Motion Detection
- 6.6.2 Configuring Video Tampering Alarm
- 6.6.3 Configuring Alarm Input
- 6.6.4 Configuring Alarm Output
- 6.6.5 Handling Exception
- 6.6.6 Configuring Other Alarm
- 6.6.7 Configuring Audio Exception Detection
- 6.6.8 Configuring Defocus Detection
- 6.6.9 Configuring Scene Change Detection
- 6.6.10 Configuring Face Detection
- 6.6.11 Configuring Line Crossing Detection
- 6.6.12 Configuring Intrusion Detection
- 6.6.13 Configuring Region Entrance Detection
- 6.6.14 Configuring Region Exiting Detection
- 6.6.15 Configuring Unattended Baggage Detection
- 6.6.16 Configuring Object Removal Detection
- 6.7 VCA Configuration
- Chapter 7 Storage Settings
- Chapter 8 Counting
- Chapter 9 Road Traffic
- Chapter 10 Playback
- Chapter 11 Log Searching
- Chapter 12 Others
- Appendix

User Manual of Network Camera
117
Notes:
● Click Delete to delete the drawn areas.
● If the live view is stopped, there is no way to draw the shield
regions.
3. Click Save to save the settings.
Rule
Steps:
1. Check the checkbox of Rule to enable rules of face capture.
2. Click Minimize Pupil Distance to draw the minimum pupil distance. The
distance of the drawn pupil will be displayed on the box below the live view.
The minimize pupil distance refers to the minimum square size composed by
the area between two pupils, and it is the basic standard for a camera to
identify a target.
3. Click Draw Area to draw the area you want the face capture to take effect.
Draw area by left click end-points in the live view window, and right click to
finish the area drawing.
Notes:
Polygon area (4~10 sides) sides is supported.
If the live view is stopped, there is no way to draw the configured area.
4. Click Save to save the settings.
Advanced Configuration
Configure the following parameters according to your actual environment.
Detection Parameters:
Generation Speed [1~5]: The speed to identify a target. The higher the value, the
faster the target will be recognized. Setting the value quite low, and if there was a face
in the configured area from the start, this face will not be captured. It can reduce the
misinformation of the faces in the wall painting or posters. The default value of 3 is
recommended.
Capture Times [1~10]: Refers to the capture times a face will be captured during its
stay in the configured area. The default value is 1.
Sensitivity [1~5]: The sensitivity to identify a target. The higher the value, the easier
a face will be recognized, and the higher misinformation is. The default value of 3 is