Quick Start Guide
Manuals
Brands
Hikvision Manuals
IP Products
Covert Network Camera
11
12
13
14
15
16
17
18
19
20
Table Of Contents
1 Appearance Description
1.1 Type I, II
1.2 Type III, IV
2 Installation
2.1 Type I, II
2.2 Type III, IV
2.2.1 Ceiling Mounting
2.2.2 Wall Mounting
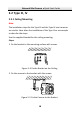
3 Set the Network Camera over the LAN
3.1 Wiring
3.2 Activate the Camera
3.2.1 Activation via Web Browser
3.2.2 Activation via SADP Software
3.3 Modify the IP Address
4 Access via Web Browser
5 Operate via Hik-Connect App
5.1 Enable Hik-Connect Service on Camera
5.1.1 Enable Hik-Connect Service via SADP Software
5.1.2 Enable Hik-Connect Service via Web Browser
5.2 Hik-Connect Setup
5.3 Add Camera to Hik-Connect
5.4 Initialize the Memory Card
Network Mini Camera
·
Quick Start Guide
17
17
2
1
1
2
3
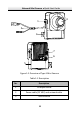
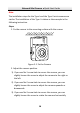
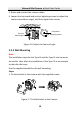
Figure 2-2
Adjust the Ca
mera P
osition
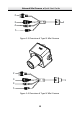
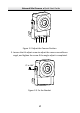
Loosen the tilt adjust screw to adjust the ca
mera surveillance
3.
angel, and tighten the screw if the angle
adjust is completed.
0°
to 180°
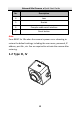
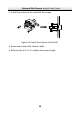
Figure 2-3
Fix the Bracket
1
...
...
15
16
17
18
19
...
...
36