
User Manual


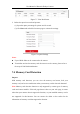


Table Of Contents
- Chapter 1 System Requirement
- Chapter 2 Network Connection
- Chapter 3 Access to the Network Camera
- Chapter 4 Wi-Fi Settings
- Chapter 5 Live View
- Chapter 6 Network Camera Configuration
- 6.1 Configuring Local Parameters
- 6.2 Configuring System Settings
- 6.3 Configuring Network Settings
- 6.3.1 Configuring TCP/IP Settings
- 6.3.2 Configuring Port Settings
- 6.3.3 Configuring PPPoE Settings
- 6.3.4 Configuring DDNS Settings
- 6.3.5 Configuring NAT (Network Address Translation) Settings
- 6.3.6 Configuring SNMP Settings
- 6.3.7 Configuring FTP Settings
- 6.3.8 Email Settings
- 6.3.9 Configuring HTTPS Settings
- 6.3.10 Configuring QoS Settings
- 6.3.11 Configuring 802.1X Settings
- 6.3.12 Configuring Platform Access
- 6.4 Configuring Video and Audio Settings
- 6.5 Configuring Image Parameters
- 6.6 Configuring Event Settings
- Chapter 7 Storage Settings
- Chapter 8 Playback
- Chapter 9 Picture
- Appendix

User Manual of Network Fisheye Camera
114
View Disk Status Figure 7-7
3. Define the quota for record and pictures.
(1) Input the quota percentage for picture and for record.
(2) Click Save and refresh the browser page to activate the settings.
Quota Settings Figure 7-8
Notes:
Up to 8 NAS disks can be connected to the camera.
To initialize and use the memory card after insert it to the camera, please refer to
the steps of NAS disk initialization.
7.4 Memory Card Detection
Purpose:
With memory card detection, you can view the memory card status, lock your
memory card, and receive notification when your memory card is detected abnormal.
Note: Memory card detection function is only supported by certain types of memory
cards and camera models. If this tab page doesn't show on your web page, it means
either that your camera doesn't support the function, or your installed memory card is
not supported for this function. You can contact the dealer or the retailer for the
information of memory card that supports the function.