
User Manual
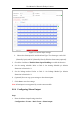


Table Of Contents
- Chapter 1 System Requirement
- Chapter 2 Network Connection
- Chapter 3 Access to the Network Camera
- Chapter 4 Wi-Fi Settings
- Chapter 5 Live View
- Chapter 6 Network Camera Configuration
- 6.1 Configuring Local Parameters
- 6.2 Configuring System Settings
- 6.3 Configuring Network Settings
- 6.3.1 Configuring TCP/IP Settings
- 6.3.2 Configuring Port Settings
- 6.3.3 Configuring PPPoE Settings
- 6.3.4 Configuring DDNS Settings
- 6.3.5 Configuring NAT (Network Address Translation) Settings
- 6.3.6 Configuring SNMP Settings
- 6.3.7 Configuring FTP Settings
- 6.3.8 Email Settings
- 6.3.9 Configuring HTTPS Settings
- 6.3.10 Configuring QoS Settings
- 6.3.11 Configuring 802.1X Settings
- 6.3.12 Configuring Platform Access
- 6.4 Configuring Video and Audio Settings
- 6.5 Configuring Image Parameters
- 6.6 Configuring Event Settings
- Chapter 7 Storage Settings
- Chapter 8 Playback
- Chapter 9 Picture
- Appendix

User Manual of Network Fisheye Camera
103
Figure 6-54 Line Crossing Detection Setting
5. Click-and-drag the line, and you can locate it on the live video as desired.
Click on the line, two red squares are displayed on each end, and you can
click-and-drag one of the red squares to define the shape and length of the line.
6. Select the direction for line crossing detection. And you can select the directions
as A<->B, A ->B, and B->A.
A<->B: Only the arrow on the B side shows; when an object going across the
plane with both direction can be detected and alarms are triggered.
A->B: Only the object crossing the configured line from the A side to the B side
can be detected.
B->A: Only the object crossing the configured line from the B side to the A side