
User Manual
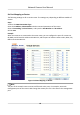


Table Of Contents
- Initiatives on the Use of Video Products
- Legal Information
- Chapter 1 Device Activation and Accessing
- Chapter 2 Network Camera Configuration
- 2.1 Update Firmware
- 2.2 Symbol Conventions
- 2.3 Safety Instruction
- 2.4 System Requirement
- 2.5 Live View
- 2.6 Video and Audio
- 2.7 Video Recording and Picture Capture
- 2.8 Event and Alarm
- 2.9 Network Settings
- 2.10 Arming Schedule and Alarm Linkage
- 2.11 System and Security
- 2.11.1 View Device Information
- 2.11.2 Search and Manage Log
- 2.11.3 Simultaneous Login
- 2.11.4 Import and Export Configuration File
- 2.11.5 Export Diagnose Information
- 2.11.6 Reboot
- 2.11.7 Restore and Default
- 2.11.8 Upgrade
- 2.11.9 Device Auto Maintenance
- 2.11.10 View Open Source Software License
- 2.11.11 Wiegand
- 2.11.12 Metadata
- 2.11.13 Time and Date
- 2.11.14 Set RS-485
- 2.11.15 Set RS-232
- 2.11.16 Power Consumption Mode
- 2.11.17 External Device
- 2.11.18 Security
- 2.11.19 Certificate Management
- 2.11.20 User and Account
- 2.12 VCA Resource
- 2.13 Smart Display
- 2.14 EPTZ
- 2.15 Image Stitching
- Appendix A. FAQ
- Appendix B. Device Command
- Appendix C. Device Communication Matrix

Conrm
Input your dial-up password again.
4.
Click Save.
5.
Access the device.
By Browsers Enter the WAN dynamic IP address in the browser address bar to access
the device.
By Client Soware Add the WAN dynamic IP address to the client soware. Refer to the
client manual for details.
Note
The obtained IP address is dynamically assigned via PPPoE, so the IP address always changes
aer reboong the camera. To solve the inconvenience of the dynamic IP, you need to get a
domain name from the DDNS provider (e.g. DynDns.com). Refer to Access to Device via Domain
Name for detail informaon.
2.9.8 Wireless Dial
Data of audio, video and image can be transferred via 3G/4G wireless network.
Note
The funcon is only supported by certain device models.
Set Wireless Dial
The built-in wireless module oers dial-up access to the Internet for the device.
Before You Start
Get a SIM card, and acvate 3G/4G services. Insert the SIM card to the corresponding slot.
Steps
1.
Go to Conguraon → Network → Advanced Sengs → Wireless Dial .
2.
Check to enable the
funcon.
3.
Click Dial Parameters to congure and save the parameters.
4.
Click Dial Plan. See
Set Arming Schedule for detailed informaon.
5.
Oponal: Set Allowlist. See for detailed informaon.
6.
Click Dial Status.
Click Refresh
Refresh the dial status.
Click Disconnect Disconnect the 3G/4G wireless network.
When the Dial Status turns to Connected, it means a successful dial.
7.
Access the device via the IP Address of the computer in the network.
-
Input the IP address in the browser to access the device.
Network Camera User Manual
68