
User Manual
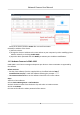

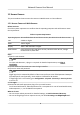

Table Of Contents
- Initiatives on the Use of Video Products
- Legal Information
- Chapter 1 Device Activation and Accessing
- Chapter 2 Network Camera Configuration
- 2.1 Update Firmware
- 2.2 Symbol Conventions
- 2.3 Safety Instruction
- 2.4 System Requirement
- 2.5 Live View
- 2.6 Video and Audio
- 2.7 Video Recording and Picture Capture
- 2.8 Event and Alarm
- 2.9 Network Settings
- 2.10 Arming Schedule and Alarm Linkage
- 2.11 System and Security
- 2.11.1 View Device Information
- 2.11.2 Search and Manage Log
- 2.11.3 Simultaneous Login
- 2.11.4 Import and Export Configuration File
- 2.11.5 Export Diagnose Information
- 2.11.6 Reboot
- 2.11.7 Restore and Default
- 2.11.8 Upgrade
- 2.11.9 Device Auto Maintenance
- 2.11.10 View Open Source Software License
- 2.11.11 Wiegand
- 2.11.12 Metadata
- 2.11.13 Time and Date
- 2.11.14 Set RS-485
- 2.11.15 Set RS-232
- 2.11.16 Power Consumption Mode
- 2.11.17 External Device
- 2.11.18 Security
- 2.11.19 Certificate Management
- 2.11.20 User and Account
- 2.12 VCA Resource
- 2.13 Smart Display
- 2.14 EPTZ
- 2.15 Image Stitching
- Appendix A. FAQ
- Appendix B. Device Command
- Appendix C. Device Communication Matrix

Cauon
STRONG PASSWORD RECOMMENDED-We highly recommend you create a strong password of
your own choosing (using a minimum of 8 characters, including upper case leers, lower case
leers, numbers, and special characters) in order to increase the security of your product. And
we recommend you reset your password regularly, especially in the high security system,
reseng the password monthly or weekly can beer protect your product.
6.
Click OK to start acvaon.
Device status change to Acve aer successful acvaon.
7.
Modify IP address of the device.
1) Select the device and click Modify
Nenfo at Online Device.
2) Change the device IP address to the same subnet with your computer by either modifying the
IP address manually or checking DHCP.
3) Input the admin password of the device and click OK to complete
modicaon.
1.1.3
Acvate Device via Web Browser
Use web browser to acvate the device. For the device with the DHCP enabled by default, use
SADP soware or PC client to acvate the device.
Before You Start
Make sure your device and your PC connect to the same LAN.
Steps
1.
Change the IP address of your PC to the same subnet as the device.
The default IP address of the device is 192.168.1.64.
2.
Open a web browser and input the default IP address.
3.
Create and
conrm the admin password.
Cauon
STRONG PASSWORD RECOMMENDED-We highly recommend you create a strong password of
your own choosing (using a minimum of 8 characters, including upper case leers, lower case
leers, numbers, and special characters) in order to increase the security of your product. And
we recommend you reset your password regularly, especially in the high security system,
reseng the password monthly or weekly can beer protect your product.
4.
Click OK to complete acvaon and enter Live View page.
5.
Modify IP address of the camera.
1) Enter IP address
modicaon page. Conguraon → Network → TCP/IP
2) Change IP address.
3) Save the
sengs.
Network Camera User Manual
3