
User's Manual
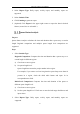
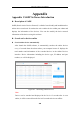
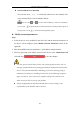

Table Of Contents
- Chapter 1 System Requirement
- Chapter 2 Network Connection
- Chapter 3 Access to the Network Camera
- Chapter 4 Wi-Fi Settings
- Chapter 5 Live View
- Chapter 6 Network Camera Configuration
- Chapter 7 Network Settings
- Chapter 8 Video/Audio Settings
- Chapter 9 Image Settings
- Chapter 10 Event Settings
- 10.1 Basic Events
- 10.2 Smart Events
- 10.2.1 Configuring Audio Exception Detection
- 10.2.2 Configuring Defocus Detection
- 10.2.3 Configuring Scene Change Detection
- 10.2.4 Configuring Face Detection
- 10.2.5 Configuring Intrusion Detection
- 10.2.6 Configuring Line Crossing Detection
- 10.2.7 Configuring Region Entrance Detection
- 10.2.8 Configuring Region Exiting Detection
- 10.2.9 Configuring Unattended Baggage Detection
- 10.2.10 Configuring Object Removal Detection
- 10.3 VCA Configuration
- Chapter 11 Storage Settings
- Chapter 12 Playback
- Chapter 13 Picture
- Chapter 14 Application
- Appendix

Network Camera User Manual
183
another camera as 81, 8001, 555, 8201 with IP 192.168.1.24. Refer to the steps as
below:
Steps:
1. As the settings mentioned above, map the port 80, 8000, 554 and 8200 for the
network camera at 192.168.1.23
2. Map the port 81, 8001, 555 and 8201 for the network camera at 192.168.1.24.
3. Enable ALL or TCP protocols.
4. Check the Enable checkbox and click Save to save the settings.
Figure A.2.3 Port Mapping
Note: The port of the network camera cannot conflict with other ports. For example,
some web management port of the router is 80. Change the camera port if it is the
same as the management port.