Quick Start Guide
Manuals
Brands
Hikvision Manuals
Network Cameras
4MP Powered by DarkFighter Fixed Turret Network Camera
31
32
33
34
35
36
37
38
39
40
Table Of Contents
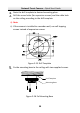
1 Appearance Description
1.1 Type I
1.2 Type II
1.3 Type III
1.4 Type IV
1.5 Type V, VI
2 Installation
2.1 Ceiling Mounting
2.1.1 Type I
2.1.2 Type II
2.1.3 Type III
2.1.4 Type IV
2.1.5 Type V, VI
2.2 Mounting with Brackets
2.2.1 Wall Mounting
2.2.2 Pendant Mounting
2.3 Network Cable Waterproof Accessory Installation
3 Set the Network Camera over the LAN
3.1 Wiring
3.2 Activate the Camera
3.2.1 Activation via Web Browser
3.2.2 Activation via SADP Software
3.3 Modify the IP Address
4 Access via Web Browser
5 Operate via Hik-Connect App
5.1 Enable Hik-Connect Service on Camera
5.1.1 Enable Hik-Connect Service via SADP Software
5.1.2 Enable Hik-Connect Service via Web Browser
5.2 Hik-Connect Setup
5.3 Add Camera to Hik-Connect
5.4 Initialize the Memory Card
Network T
urret Camera
·
Quick Start Guide
34
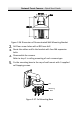
Figure 2-
33
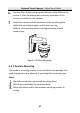
Secure the Mou
nting t
o the Ceiling
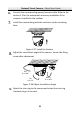
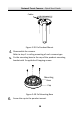
7.
Connect the co
rresponding power and network cables
.
8.
Install the camera to the mounting base
with the screws.
Figure 2-
34
Secure the Camera to the Mounting Base
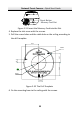
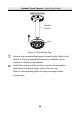
9.
Adjust the Lens.
1
...
...
33
34
35
36
37
...
...
59