
Quick Start Guide


QSG DS-2CD23xxxx-xx Turret 051420NA 28
2.3 Network Cable Waterproof Accessory Installation
Purpose
If the camera is installed outdoors, you can use the waterproof accessory for the network cable
after the camera is secured on the installation surface.
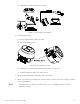
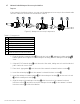
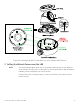
Figure 41, Waterproof Accessory Components
Table 2-1 Components
No.
Components
1
Camera’s Network Interface Sock
et
2
O
-
Type Gasket
3
Network Plug
4
Waterproof Endcap
5
Waterproof Rubber Gasket
6
Lock Nut
7
Network Cable from
Router/Switch
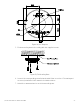
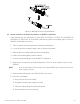
1.
Feed the plugless network cable ⑦
⑦⑦
⑦ through the lock nut ⑥
⑥⑥
⑥, waterproof rubber gasket ⑤
⑤⑤
⑤
(rubber gasket inset ridge must face waterproof endcap), and the waterproof endcap ④
④④
④ in
order.
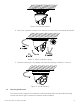
2.
Crimp an RJ-45 network plug ③
③③
③
onto the end of the cable, taking care to insert the twisted
pairs of wires in correct order.
3.
Place the O-type gasket ②
②②
② onto the end of the camera’s network interface socket ①
①①
①.
4.
Insert the network plug ③
③③
③ into the camera’s network interface socket ①
①①
①.
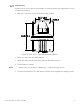
5.
Insert the waterproof rubber gasket ⑤
⑤⑤
⑤ into the waterproof endcap ④
④④
④, and secure lock nut
⑥
⑥⑥
⑥ with the waterproof endcap ④
④④
④.
6.
Align the snap on the waterproof endcap ④
④④
④ with the notch on the camera’s network
interface socket ①
①①
①, and then secure the waterproof endcap ④
④④
④ to the camera’s network
interface socket ①
①①
① to finish installation.