O P E R AT I N G MANUAL EN FIBARO DOOR/WINDOW SENSOR 2 FGDW-002 CONTENTS #1: Description and features #2: Basic activation #3: Adding/removing the device #4: Physical installation #5: Operating the device v1.
Important safety information ! Read this manual before attempting to install the device! Failure to observe recommendations included in this manual may be dangerous or cause a violation of the law. The manufacturer, Fibar Group S.A. will not be held responsible for any loss or damage resulting from not following the instructions of operating manual. The alarm functionality of devices is an additional feature increasing the comfort level of your home automation system.
#1: Description and features FIBARO Door/Window Sensor 2 is a wireless, battery powered Hall effect contact sensor, compatible with the Z-Wave Plus standard. Changing the device’s status will automatically send signal to the Z-Wave controller and associated devices. Sensor can be used to trigger scenes and wherever there is a need for information about opening or closing of doors, windows, garage doors, etc. Opening is detected by separating the sensor’s body and the magnet.
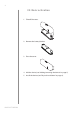
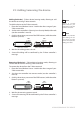
#2: Basic activation 1. Take off the cover. 2. Remove the battery blocker. 3. Close the cover. 4. Add the device (see “Adding/removing the device” on page 5). 5. Install the device (see “Physical installation” on page 6).
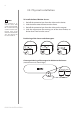
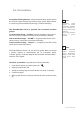
#3: Adding/removing the device Adding (Inclusion) - Z-Wave device learning mode, allowing to add the device to existing Z-Wave network. To add the device to the Z-Wave network: 1. Place the Door/Window Sensor 2 within the direct range of your Z-Wave controller. 2. Set the main controller in (Security/non-Security Mode) add mode (see the controller’s manual). 3. Quickly, three times press one of the TMP buttons (while the other button is pressed).
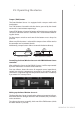
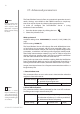
#4: Physical installation i NOTE It is possible to install the device with screws (not included). We recommend using 2.5mm x 16mm countersunk head screws with 5mm head diameter. The magnet still has to be stuck on. To install the Door/Window Sensor: 1. Peel off the protective layer from the sticker on the device. 2. Stick the device onto the door/window frame. 3. Peel off the protective layer from the sticker on the magnet. 4.
#5: Operating the device Tamper (TMP) button: The Door/Window Sensor 2 is equipped with a tamper switch with two buttons. First TMP button is located inside the device, pressed by the closed cover and is used to detect openning it. Second TMP button is located at bottom of the device, pressed by the surface on which the device is mounted and is used to detect detaching the device.
i NOTE Opening the casing may result in triggering an alarm. To avoid it, remove the associations for the 3rd group. i NOTE Resetting the device is not the recommended way of removing the device from the Z-Wave network. Use reset procedure only if the primary controller is missing or inoperable. Certain device removal can be achieved by the procedure of removing described in “Adding/ removing the device” on page 5.
#6: Association Association (linking devices) - direct control of other devices within the Z-Wave system network e.g. Dimmer, Relay Switch, Roller Shutter or scene (may be controlled only through a Z-Wave controller). The Door/Window Sensor 2 provides the association of three groups: 1st Association Group – “Lifeline” reports the device status and allows for assigning single device only (main controller by default).
#7: Advanced parameters i NOTE Entering invalid value of parameter will result in response with Application Rejected frame and not setting the value. The Door/Window Sensor 2 allows to customize its operation to user’s needs. Settings are available in the FIBARO interface as simple options that may be chosen by selecting the appropriate box. In order to configure the Door/Window Sensor 2 (using the Home Center controller): 1. Go to the device options by clicking the icon: 2.
3. Associations in Z-Wave network Security Mode This parameter defines how commands are sent in specified association groups: as secure or non-secure. Parameter is active only in Z-Wave network Security Mode. It does not apply to 1st group “Lifeline”. Available settings: 0 - none of the groups sent as secure 1 - 2nd group ”On/Off” sent as secure 2 - 3rd group ”Tamper” sent as secure Default setting: 3 - 2nd and 3rd group sent as secure 3 (all) Parameter size: 1 [byte] 11.
15. Association for closing - time delay Time that must elapse from closing to send the command frame to devices in 2nd association group. Available settings: 0-32400 - time in seconds Default setting: 0 Parameter size: 2 [bytes] 30. Tamper - alarm cancellation delay Time period after which a tamper alarm will be cancelled. Available settings: 0-32400 - time in seconds Default setting: 5 Parameter size: 2 [bytes] 31.
53. Temperature offset The value to be added to the actual temperature, measured by the sensor (temperature compensation). Available settings: -1000–1000 (-100–100°C, 0.1°C step) Default setting: 0 (0°C ) Parameter size: 2 [bytes] 54. Temperature alarm reports Temperature alarms reported to the Z-Wave controller. Thresholds are set in parameters 55 and 56.
#8: Specifications ! CAUTION Using batteries other than specified may result in explosion. Dispose of properly, observing environmental protection rules. i NOTE Battery life depends on frequency of usage, number of associations/scenes, Z-Wave routing and network load. i Power supply: 3.6V DC battery Battery type: ER14250 ½ AA Battery life: est.
#9: Regulations This device complies with Part 15 of the FCC Rules Operation is subject to the following two conditions: 1. This device may not cause harmful interference 2. This device must accept any interference received, including interference that may cause undesired operation. This equipment has been tested and found to comply with the limits for a Class B digital device, pursuant to part 15 of the FCC Rules.
DGT Warning Statement Article 12 Without permission, any company, firm or user shall not alter the frequency, increase the power, or change the characteristics and functions of the original design of the certified lower power frequency electric machinery.