
User's Manual
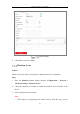
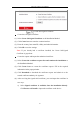
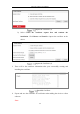
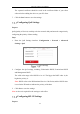
Table Of Contents
- Chapter 1 System Requirement
- Chapter 2 Network Connection
- Chapter 3 Access to the Network Camera
- Chapter 4 Wi-Fi Settings
- Chapter 5 Live View
- Chapter 6 Network Camera Configuration
- Chapter 7 Network Settings
- 7.1 Configuring Basic Settings
- 7.2 Configure Advanced Settings
- 7.2.1 Configuring SNMP Settings
- 7.2.2 Configuring FTP Settings
- 7.2.3 Configuring Email Settings
- 7.2.4 Platform Access
- 7.2.5 Wireless Dial
- 7.2.6 HTTPS Settings
- 7.2.7 Configuring QoS Settings
- 7.2.8 Configuring 802.1X Settings
- 7.2.9 Integration Protocol
- 7.2.10 Bandwidth Adaptation
- 7.2.11 Network Service
- 7.2.12 Smooth Streaming
- Chapter 8 Video/Audio Settings
- Chapter 9 Image Settings
- Chapter 10 Event Settings
- 10.1 Basic Events
- 10.2 Smart Events
- 10.2.1 Configuring Audio Exception Detection
- 10.2.2 Configuring Defocus Detection
- 10.2.3 Configuring Scene Change Detection
- 10.2.4 Configuring Face Detection
- 10.2.5 Configuring Intrusion Detection
- 10.2.6 Configuring Line Crossing Detection
- 10.2.7 Configuring Region Entrance Detection
- 10.2.8 Configuring Region Exiting Detection
- 10.2.9 Configuring Unattended Baggage Detection
- 10.2.10 Configuring Object Removal Detection
- 10.3 VCA Configuration
- Chapter 11 Storage Settings
- Chapter 12 Playback
- Chapter 13 Picture
- Chapter 14 Application
- Appendix

Network Camera User Manual
84
view live image of the camera, receive alarm notification and so on.
• Connect the camera to network with network cable before enabling
Hik-Connect.
If you select Platform Access Mode as Hik-Connect,
1) Click and read "Terms of Service" and "Privacy Policy" in pop-up window.
2) Create a verification code or change the verification code for the camera.
Note:
• The verification code is required when you add the camera to Hik-Connect
app.
• For more information about the Hik-Connect app, refer to Hik-Connect
Mobile Client User Manual.
3) You can use the default server address. Or you can check the Custom checkbox
on the right and input a desired server address.
If you select Platform Access Mode as Ehome,
1) Check Enable.
2) Enter the Server Address, Port, Device ID, and Key.
4. Click Save to save the settings.
Wireless Dial
Purpose:
Data stream of audio, video and image can be transferred via 3G/4G wireless
network.
Notes:
• The wireless dial function may not be supported by some camera models.
• Camera that supports wireless dial does not support PPPoE.
Steps:
1. Click Wireless Dial tab to enter the Wireless Dial configuration interface:
Configuration > Network > Advanced Settings > Wireless Dial
2. Check the checkbox to enable the wireless dial settings.